It’s crossover week! Check out the newest video:
This 7-part series becomes more interesting as crossovers–a true staple of tenor drumming–are explored in a variety of ways. This video covers 13 crossover patterns, including a long “Crossover Builders” exercise that goes through all 18 crossover positions.
The “Crossover Builders” exercise and a transcript of the video are included below. Just a reminder: If you don’t already have The Art of Multi-Tenor Drumming, you can get 366 pages full of instruction, movement patterns, rudimental exercises, independence grooves, solos, and more. Click here to get your copy today!
TRANSCRIPT
Hello, everybody. This is James Christian, and we are here today with video #4 in our series on essential skills for tenor drumming.
Fundamentals of Crossover Technique
Today we are going to enter the wonderful world of crossovers. Now, crossovers have two main purposes: One is musical, and the other is visual. We will start with the musical.
Now, “crossover” simply means one hand crosses over the other. Like in this situation.
The Three Main Positions
There are three main positions you need to know, but overall, there are 18 positions. And I’ll cover all of those in just a second. But the way to think about it is breaking it down into the three essential positions.
When you have the widest stretch over drums #3 and #4, your hands are going to crossover about here– just slightly past the halfway point of your forearm. And they’ll cross and make an X-shape like that.
When you get a little bit narrower–say, between drums #1 and #4–you’re going to crossover closer to the wrist right here.
And then when you get the narrowest, two drums next to each other–say, drums #1 and #2–you’re probably going to have to crossover with your hands over each other. If you have a little wider room–say, on drums #2 and #4–you can crossover just above your fulcrum.
It just depends on the difficulty of the musical passage where you can. You may be able to do it right above there. It just depends on what you’re playing and where you’re going and all that. But basically, it’s just knowing where you crossover; and the tighter the position gets, the more it moves in.
The 18 Individual Positions
Now, there are 16 primary positions and 2 secondary positions. I’ll cover all of those.
So there are 8 for each hand. So right over left, you’ve got: 1, 2, 3, 4, 5, 6, 7, 8. And then with left over right, you have: 1, 2, 3, 4, 5, 6, 7, 8. Now, all of those positions you need to become comfortable with. Some you see more often than others, but they all do happen.
The secondary positions I mentioned come with the spock drum. And that is when your right hand is on drum #2 and your left hand is on the spock drum, or your right hand is on the spock drum and your left hand is on drum #1. So most of the time you can avoid this position as a crossover.
So say you have something like this:
[demonstration]In both situations, you don’t need to crossover. But sometimes, if you’re having to move quickly between drums #2 and #4, you have to have a crossover position there to execute it effectively. So something like this:
[demonstration]In those kinds of situations, you do have a crossover. And you’ll find you tend to crossover almost there. I try to get closer to where the wrist turn is, so that I’ve got a little more room to move, but–
[demonstration]But just depending on what it is, you may have a little more of that, especially if you’re going between drums #1, #2, and #4. Maybe something like this:
[demonstration]So you’ll notice right when I’m hitting it, I’m trying to hit kind of more in the center of the drum there, so it may be more with the hand over the tip of the stick in that situation.
Now, with all crossovers, you’re going to have–Whichever hand is on top, it’s going to be raised slightly. And whichever hand is on bottom, it’s going to be lowered slightly. This is true for all positions, even the wide ones. You’ll notice this hand is slightly over. This one I’m having to drop just a little bit.
It’s not real drastic with the wider positions. But the narrower you get, the more you have to drop that one to where my wrist is almost touching the spock drum, and my upper hand I try to raise up just a little bit–a little bit with the elbow, a little bit with the wrist–not too drastic with either one, to where you still maintain a generally good up-and-down arm position. But you do have to do that a little bit, just so you’re not hitting your hands against each other.
At the end of the video, I’m going to show you an exercise that covers all 18 positions, and it’s really good for building your spatial memory. I’ve never shown this to anyone before, so you guys will be the first to get it.
Crossover Exercises
Now on to the exercises.
If you’ll remember in the first video, we did all the one-handed movement patterns, and I said, “Just get the other hand out of the way. Focus on proper playing zones and arm position.” Now we’re going to play parts that require that other hand to be there.
Singles Exercises
So for now, we’re going to start with our position as the right hand over drum #1 and the left hand over drum #2. I want you just to leave your left hand still for a moment, and your right hand is going to do slow 8th notes. You’re going to go drum #1, drum #2, drum #4, drum #2. And just keep doing that over and over again. Practice the crossover positions.
[demonstration]Once you feel comfortable with that, you’re going to add the left hand in between. So if these are 8th notes, you’re going to now be playing 16th notes. And you’re just going to keep the left hand on drum #2. So here you go:
[demonstration]All right, now finally, I want to practice reaching a little farther with your right hand. So you’re going to take out drum #2 with the right hand. You’re going to keep the left hand in between. So let’s do it slowly as 8th notes at kind of a moderate tempo.
[demonstration]Now do it a bit faster.
[faster demonstration]You’ll notice, as you get wider reaches and the tempo increases–you’ll notice it just looks cool, and you get a lot of visual movement from that. Notice also I am not accenting every crossover note. I’m trying to keep it as smooth as I can both with the rhythm and with the volume.
All right, let’s do the same thing off the left hand. So keep your right hand still over drum #1 now. And your left hand is just going to play slow 8th notes over drums #2, #1, #3, #1, #2, and keep repeating.
[demonstration]Now add in the right hand in between.
[demonstration]Now, finally, your left hand is going to quit playing on drum #1, and you’re just going to go between #2 and #3 with a wider stretch.
[demonstration]Now faster:
[faster demonstration]Triplets
All right, that’s the basic patterns. And now we’re going to take some of the previous patterns we’ve played and add crossovers to them.
Let’s start with triplets. I’m going to do it between drums #1, #2, and #4. The first measure, you’re just going to reach out and put the downbeat on the adjacent drums. So here’s the first measure:
[demonstration]On the second measure, you’re going to add crossovers. So you’re going to switch which drum you’re hitting.
[demonstration]So here’s the whole exercise repeated a few times:
[demonstration]Now you can do the same thing on the left hand with drums #1, #2, and #3. That’s up to you. It’s essentially practicing the same skill.
Paradiddles (with Variations)
Now I want to do the same thing with paradiddles I’ll switch over to the other side, just for contrast. So do the same thing–where you’re going to reach out and do the downbeats moving out. And then the second measure, you’re going to crossover on all the downbeats. So here you go, the paradiddle measures:
[demonstration]Notice I’m still not putting accents on the paradiddles. We will in just a second. But for now, I want to try something where we shift where the crossover happens.
So we’re going to do just straight paradiddles, and I want to crossover the second note of every paradiddle. Here you go:
[demonstration]Finally, I want to crossover the last two–the diddle part of the paradiddle–notes three and four.
[demonstration]Now we’re going to add an accent on the downbeats, just like traditional paradiddles, except I’m going to shift the crossover–where it occurs.
I’m not going to write this one out on the exercises for this, but it’s an idea for you to play around with. Practice doing different patterns where you put accents on some crossovers and you don’t put accents on some crossovers, and you’ll see it will build your coordination on this.
So I’m going to do paradiddles with a crossover on the first note, then the second note, then the diddle part. And I’m going to keep the accent on the downbeat every time. So here you go:
[demonstration]So it’s something to play around with. Again, on all these videos, if you’re a more advanced player, you can take these a lot faster. So you might try this more at a brisker pace. Try it:
[faster demonstration]So if you can get those pretty solid–at being able to have control over accents or non-accents–you’ll find your coordination really improves on these.
Single, Double, & Triple Paradiddles
All right, we’re going to do two more exercises. This next exercise is going to be straight up paradiddles, then followed by double paradiddles, and then triple paradiddles. And then it’s going to go back down to doubles and then singles.
So the first two paradiddles, you’re going to do like we’ve done before, where you move it out. And then you’re going to do two paradiddles where you crossover. And then you’re going to do the same thing with double and then triple paradiddles, and then go back down to doubles and singles.
We’re going to add accents on the first note of each. And we’ll play it at kind of a moderate tempo.
[demonstration]A little bit quicker:
[faster demonstration]And if you want some real speed, here we go:
[even faster demonstration]Paradiddlediddles
The final exercise is going to be paradiddlediddles going down the drums and then back up. So the first time, we’re going to do it with right hand lead. And you’re going to go straight down and then crossover on the second one.
[demonstration]You can do the same thing with the left hand going up and then down.
[demonstration]And again, if you’re a more advanced player, try taking it a little faster. If you’re not there yet, that’s okay. Don’t try to push it too far. Just focus on good technique, and playing zones, and all that. But once you get more comfortable with this, start taking it a notch faster.
[faster demonstration]And then, a lot faster:
[even faster demonstration]Visual Presence with Crossovers
I said at the beginning, crossovers can be used for musical reasons and visual reasons. So far we’ve focused on primarily musical reasons. Let’s focus on the visual reasons now.
So here are two examples when you might want to use crossovers purely for a visual reason. Suppose you end the piece with some big impacts on the bottom two drums, and you have this rhythm:
[demonstration]So 1, 2, 4, tri-pl-et, 1. That was the rhythm in 4/4. Now what you can do is take that same rhythm, but then you can add a little bit more visual interest to it by playing it with some crossovers mixed in.
[demonstration]So if it’s a moment that you want to be really big and bold, and you want to have it as just full out as you can, then adding that visual emphasis will really complete the picture musically and visually.
Visual Flashiness with Crossovers
Now another situation is where–just adding something that’s really flashy, if you want to accentuate that it’s something impressive you’re playing. Suppose you had a piece in concert music with three concert toms. Usually they’ll just write the drums they want, and they won’t give you the sticking. So this particular pattern–suppose I was going to do some fast 32nd notes with each grouping of four moved to drums #4 and #1.
I would probably, in concert band, play that with paradiddles starting on the left hand. That would probably be the smoothest way to play it. So it would be like this:
[demonstration]If you had something like that in concert band. Usually you don’t get that kind of stuff as frequently. But if that was a passage in an orchestral piece or wind band piece, then that would probably be the least cumbersome way to play it.
But if you’re doing something that you want more visual presence for, such as marching band or a tenor solo, you could play that same passage starting on the right hand and do crossovers on every one. So it would be like this:
[demonstration]So there’s virtually no difference in the sound you’re getting. But visually, it just adds a lot more impressiveness. If you’re going to play that passage twice, you might start the first time with the left hand and then add something interesting visually by playing it on the right hand. So it would have the same musical repetition, but visually you would add something unique each time.
So just be aware of how you can use crossovers to enhance the visual package of the music. If it’s something that you want to be more understated, you may want to avoid those crossovers as much as possible. But if you want it to be flashy, and big, and bold–then you may want to add more crossovers.
So just another tool in your toolbox to create a whole presentation.
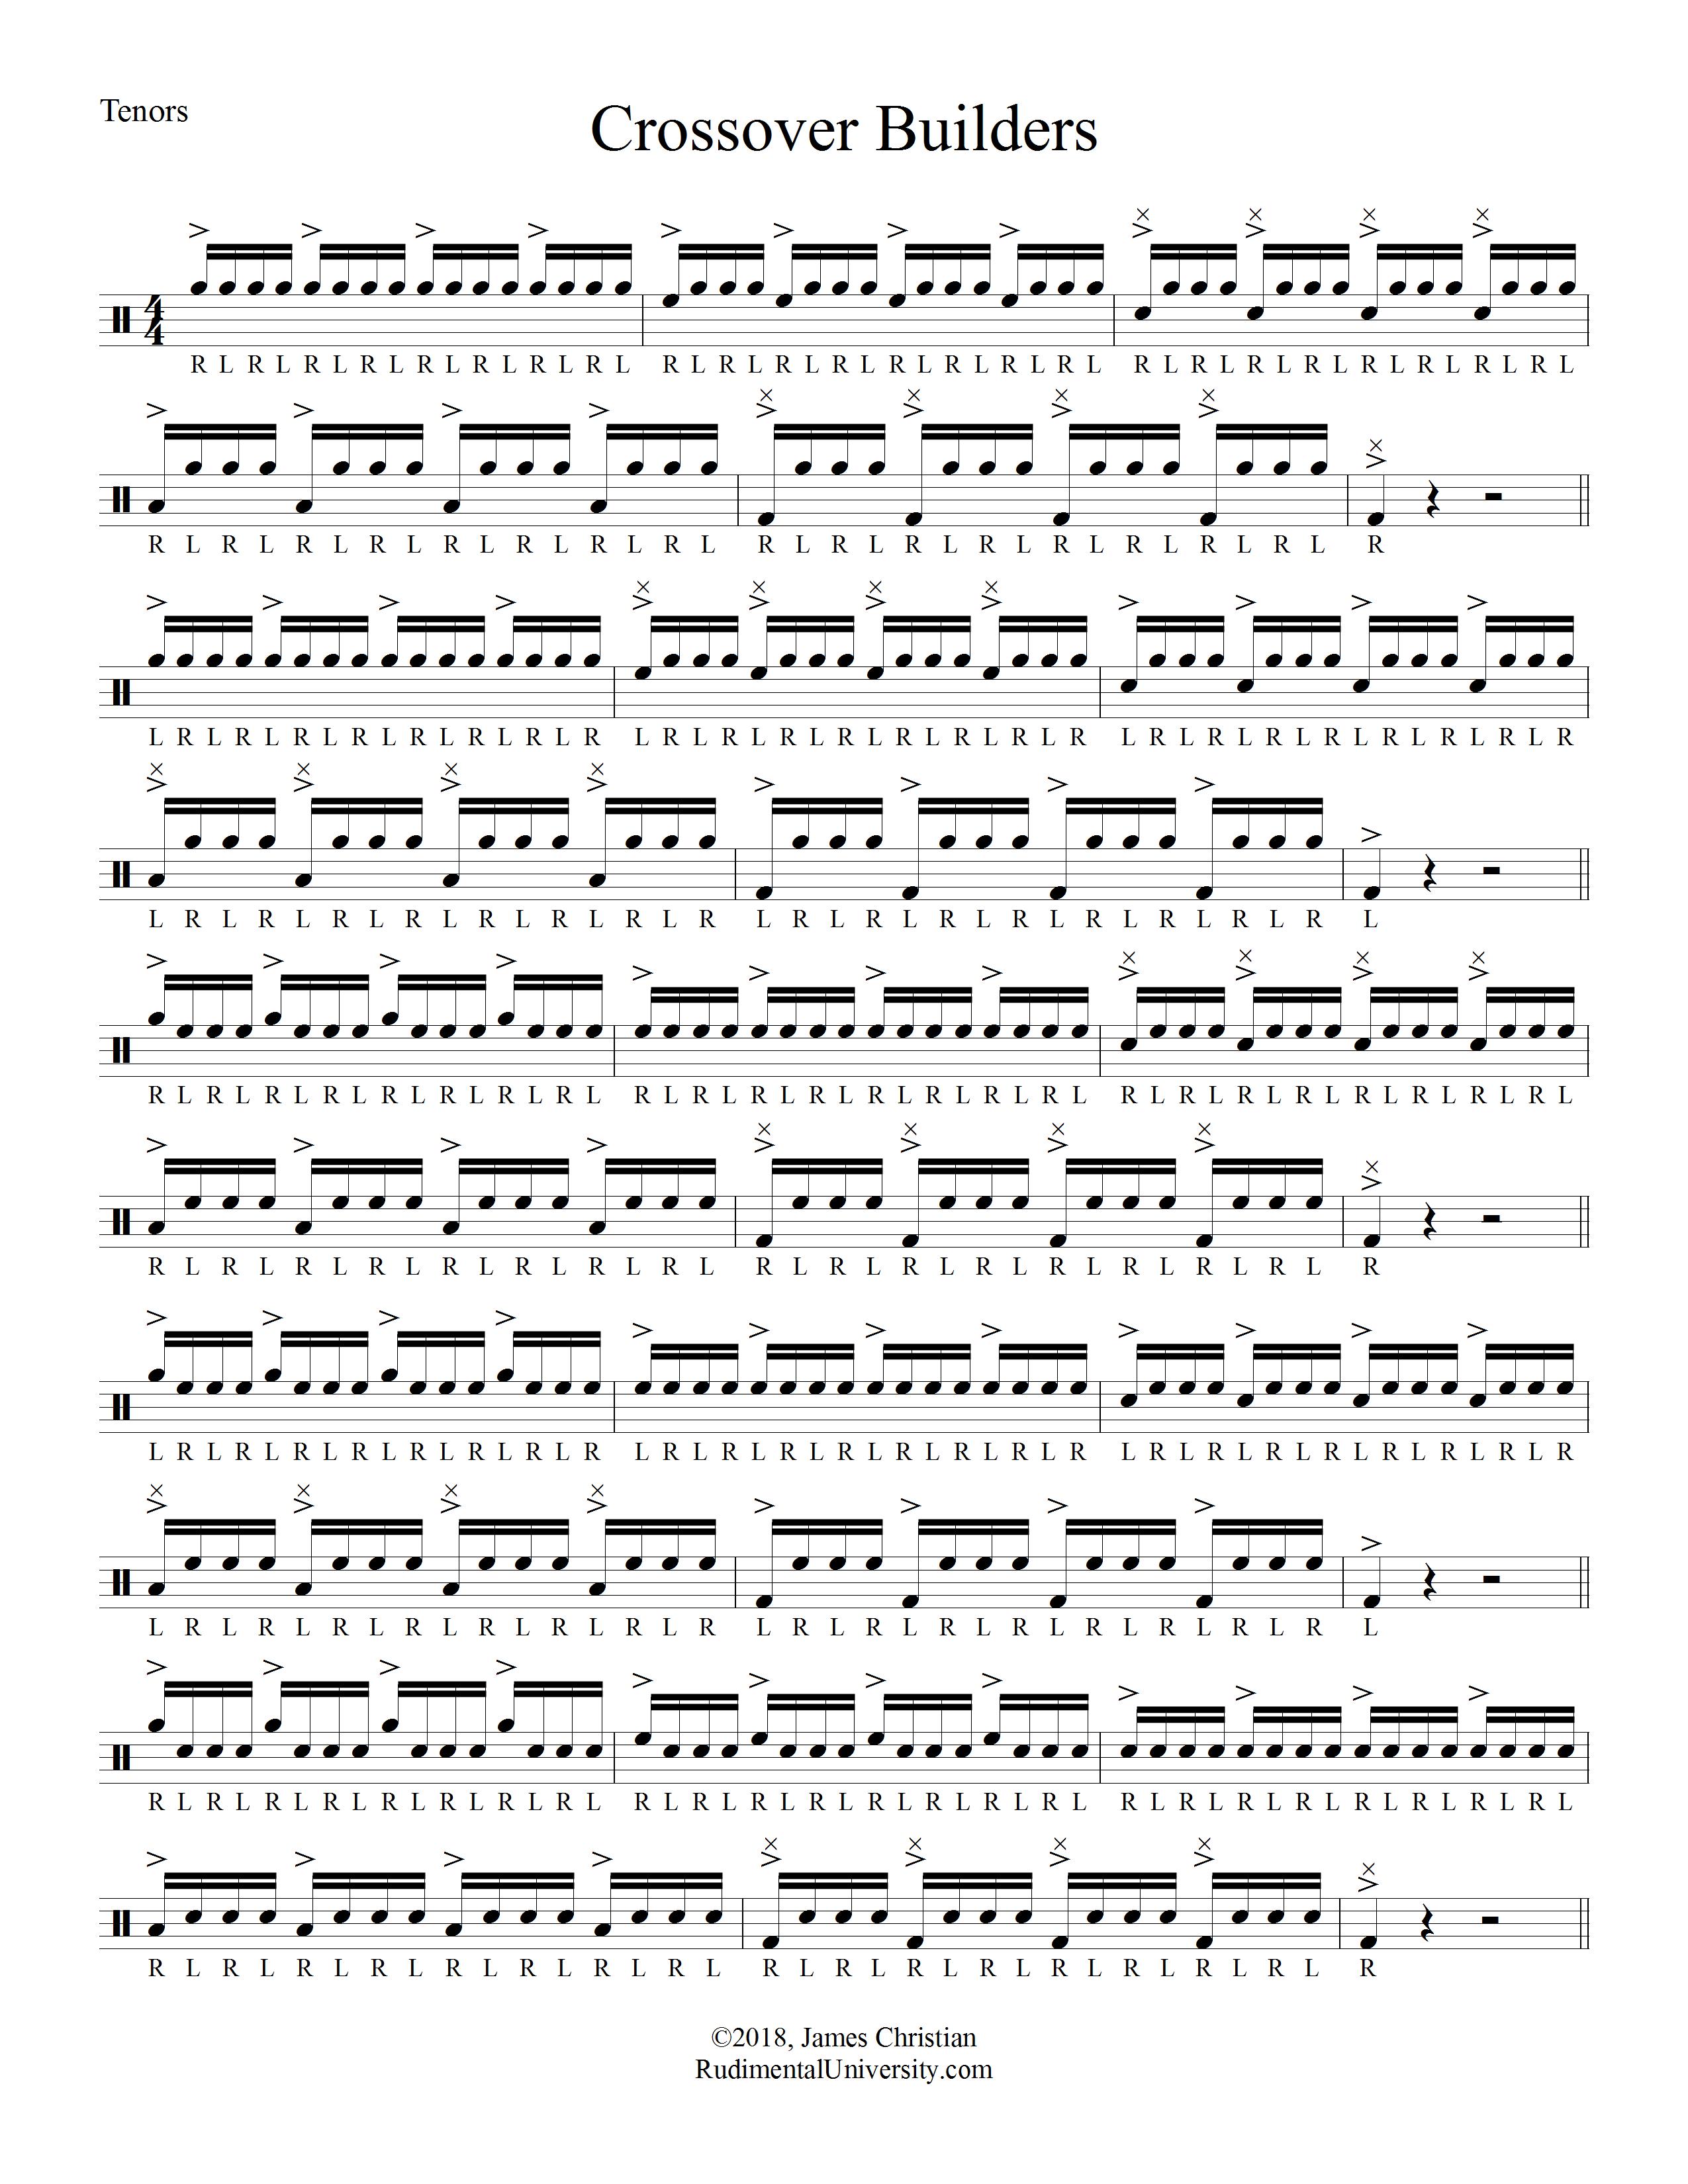
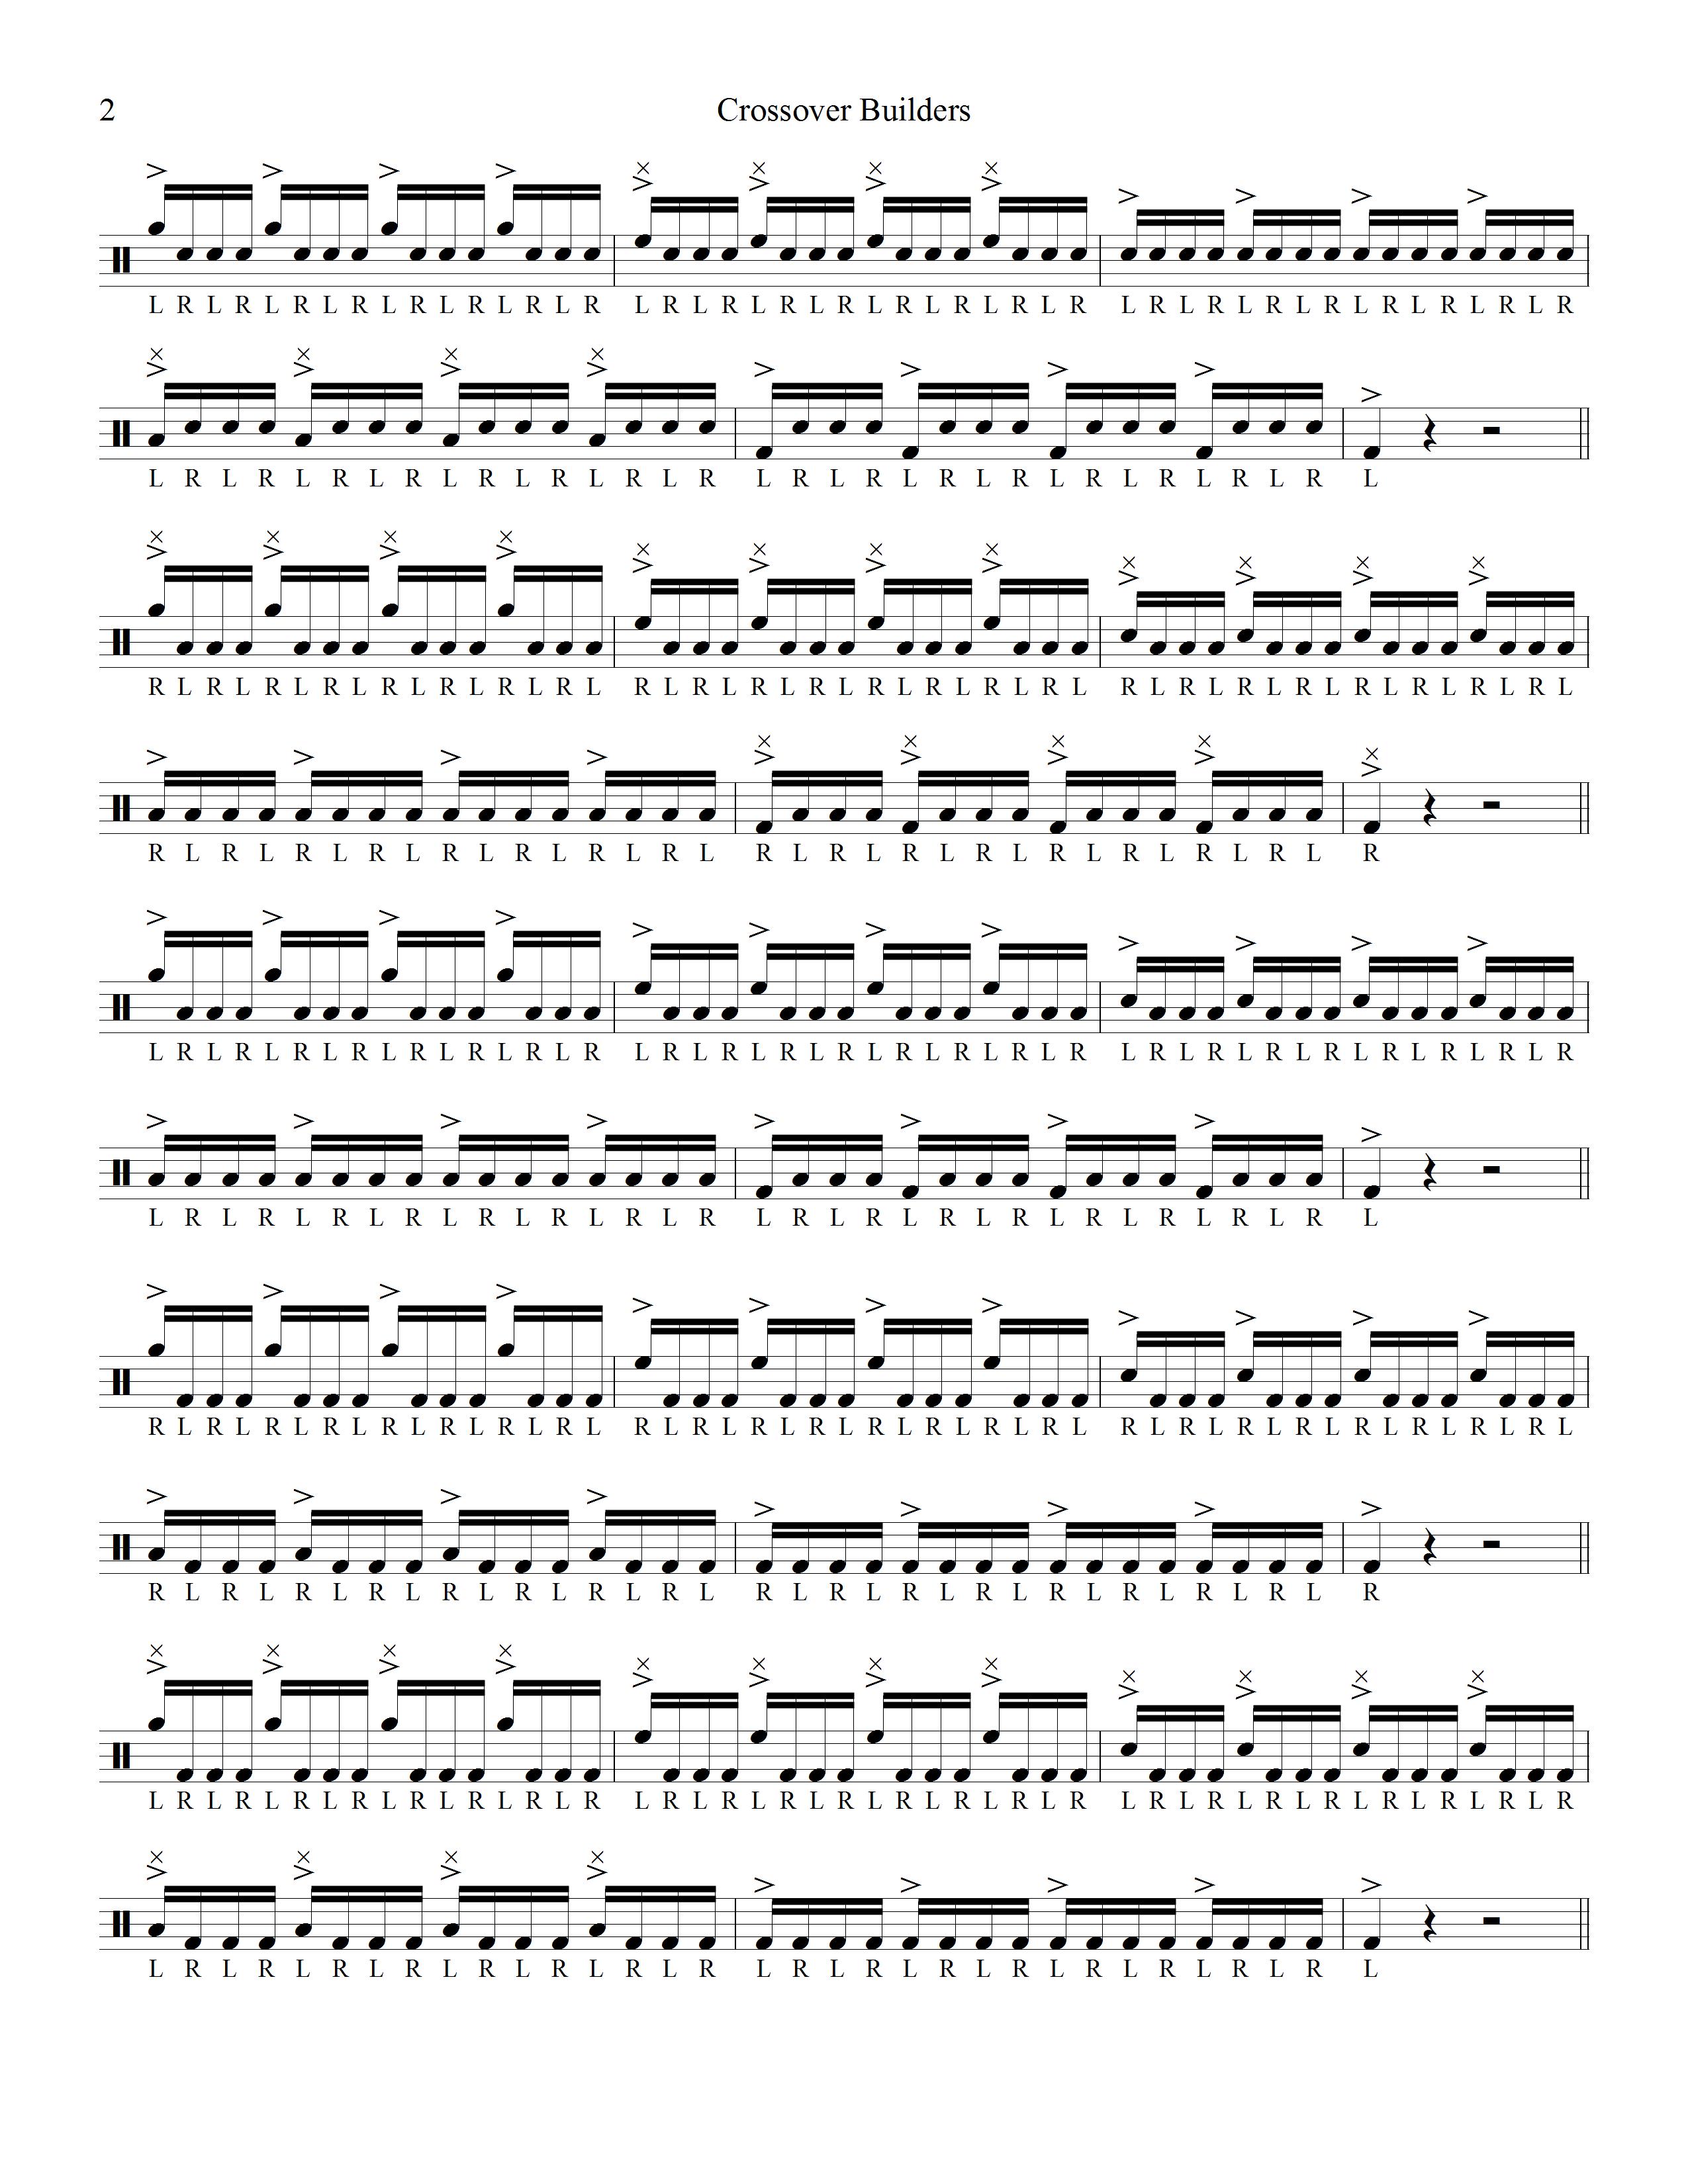
“Crossover Builders” Exercise
All right, finally, we are going to conclude with an exercise that will use all 18 crossover positions. This is an exercise I came up with a little while back. I came up with it after I wrote my tenor book, so it’s not in there. And I’ve never shared this with anyone before, so you guys are going to be the first to get it. But I’ve found it’s a really good exercise for just building your awareness and forcing you to play in every crossover position.
So what it is–it’s just straight 16th notes. You accent each downbeat. I’m going to start on the spock drum and just move down the drums for those downbeats. And then all the inner beats are going to stay on the individual drums. So as you get through them all, you will have played every position.
Now, when you get to the two positions I said are secondary–on the drum #2 over the spock drum or drum #1 over the spock drum–I would go ahead and practice them that way. It’s not essential; you can do it without the crossover. But might as well go ahead and get the practice in while you’re doing the exercise for that reason.
All right, here we go. Here’s the exercise:
[demonstration]All right, and that will do it for today. You’ll notice in a couple of those patterns on the last one, some of them have no crossovers, just because when you’re on the outer drums, you have more room to reach out. So it’s a mix of crossovers and non-crossovers, and most music has that mixture. So that’s just a good exercise to combine all the types of setups you may see.
Concluding Thoughts
So all right, you know the spiel. If you like this, please share it. Help other people out who could use this information. And “like” the video. If you have any comments, or things you think help better, or any questions,
or anything–feel free to leave comments below, and I’d love to hear from you.
Thanks for watching. Next time we’re going to enter the wonderful world of sweeps, and scrapes, or split doubles–or whatever term you like to use.
All right, thanks. Have a good day. Bye!