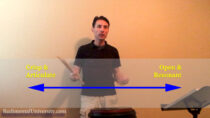
Resonance is a big buzzword in percussion today. Unfortunately, it is often discussed as if there is only one proper style and technique to achieve it. In the process, a great deal of music is ignored. Today I want to dismantle it a bit and show that there is a full spectrum of resonance. On one end, you have crisp, articulate playing. On the other end, you have open, resonant playing. Both approaches are necessary for different musical situations. This video showcases two snare drum etudes played with different approaches to demonstrate the variety of techniques.
This exercise has gone through many tweaks and additions over the years. In its current version, I think it’s a great tool in the arsenal of any percussionist. When I first encountered this exercise, the first four sections were taught to me and the other students at Princeton High School (Princeton, Texas) by Rick Beckham. This covered the accented 8th notes off the right hand and left hand, plus the accented 16th notes off the right hand and left hand. He later added the next four sections (8th note flams leading with the right and left, plus the accented paradiddle patterns leading with the right and left).
The four main patterns—8th notes, 16th notes, flams, and paradiddles—are great for developing the control needed to distinguish accent and tap heights. I have used this core exercise with several different drum lines, and it has been quite effective.
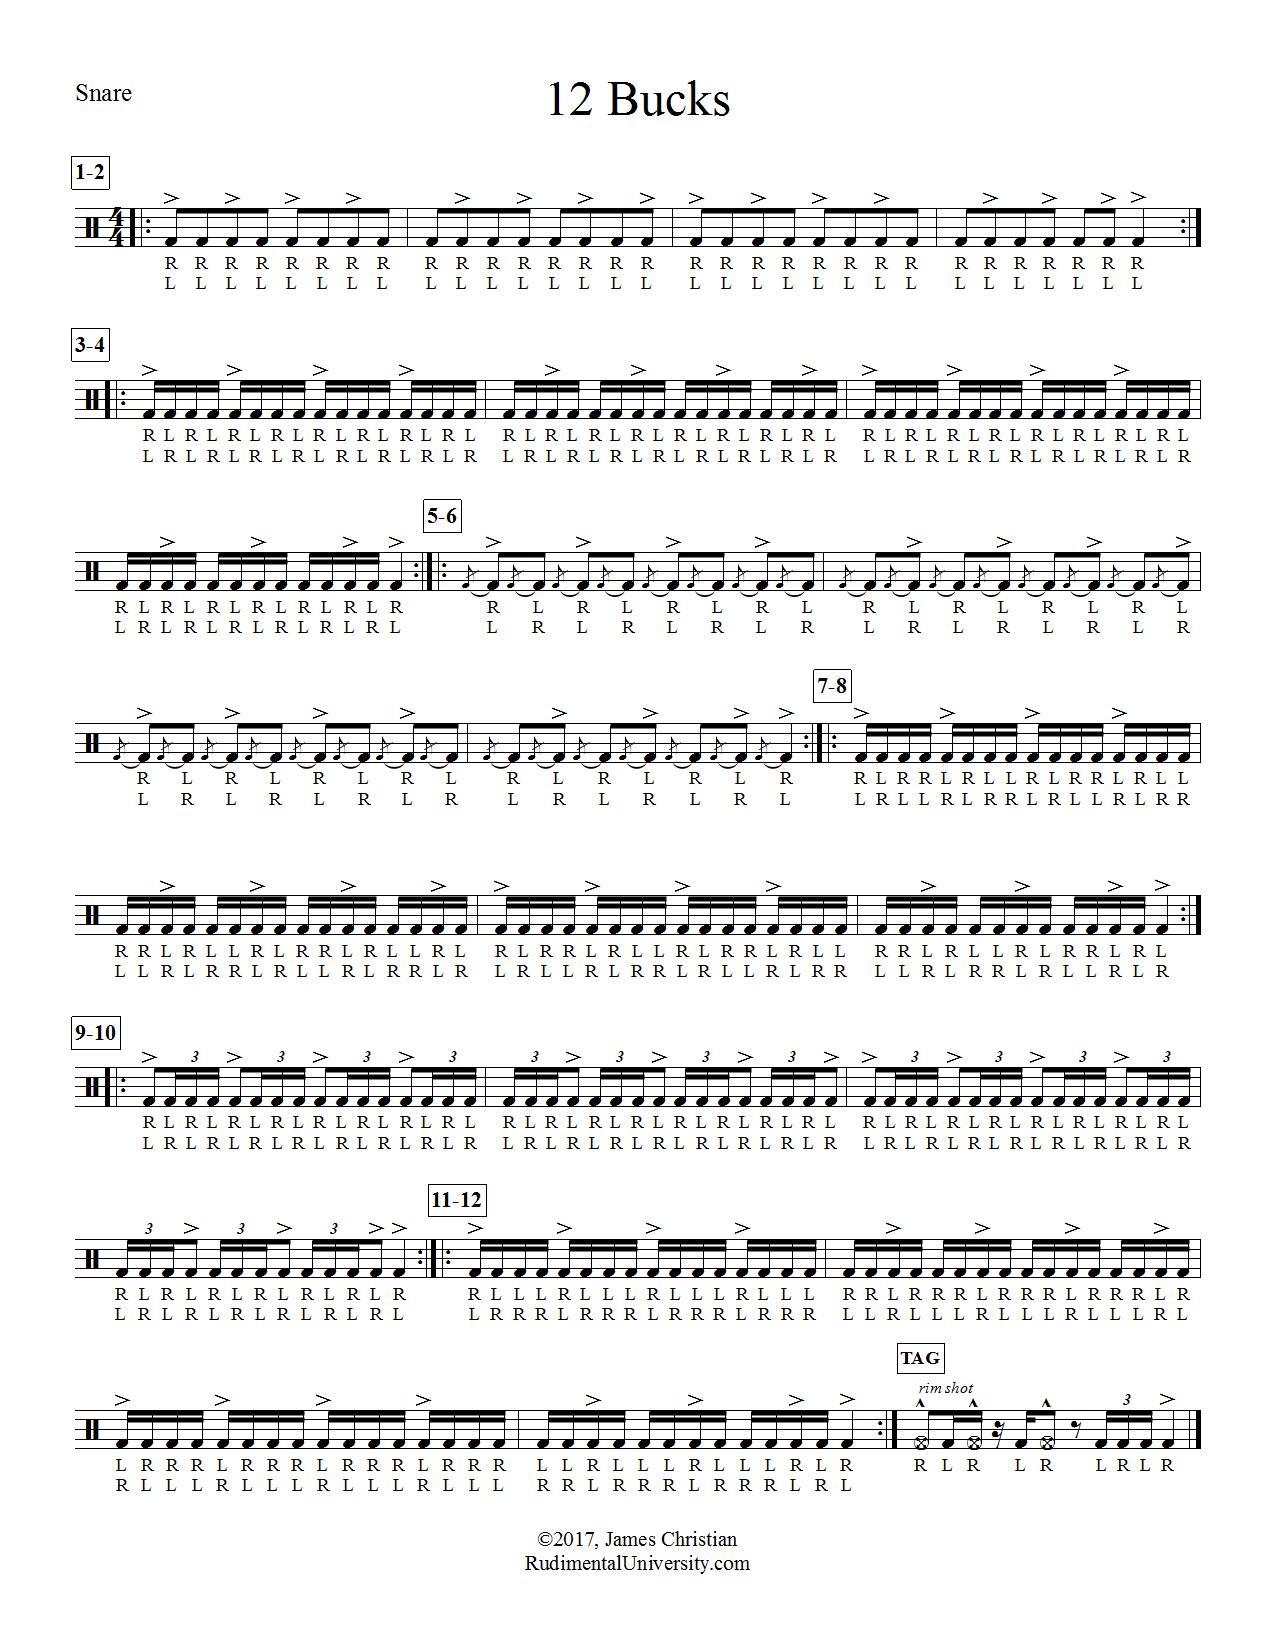
Over time, I decided to expand the exercise. In personal practice, I used the basic accent structure on a number of different rudimental patterns. When teaching it to a full drum line, I decided that I wanted to write a mallet part that went through the circle of fifths, covering all 12 major keys.* I also wanted a bass drum part that worked split 16th note triplets and 32nd notes. So I picked two of my favorite rudimental patterns that worked with that rhythmic structure to add sections 9-10 and 11-12. In short, this exercise has something really useful for every section.
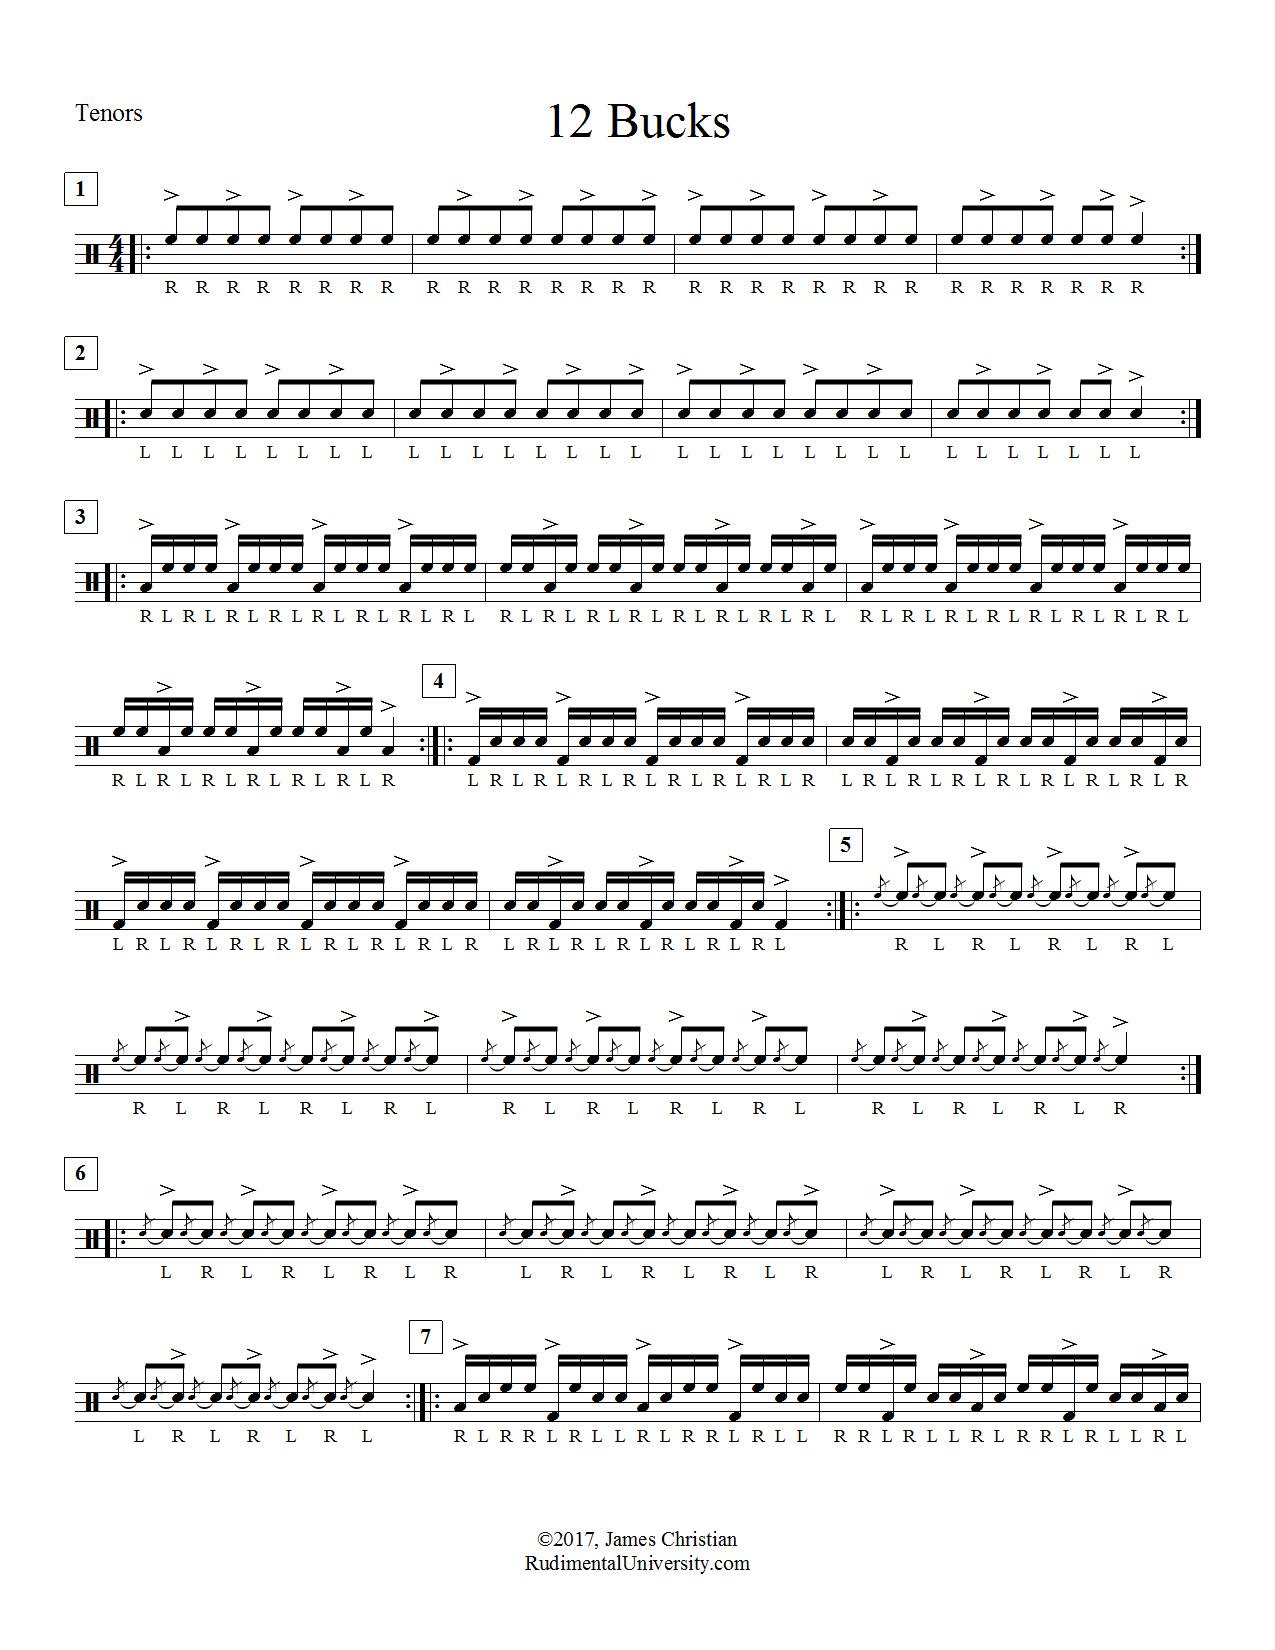
Since 12 sections are covered by going through the circle of fifths and the snare drum part is similar to the standard “Bucks” exercise, I decided to call the exercise “12 Bucks.” Here is the breakdown of the skills required for snare drum and tenors:
Sections 1-2: One-handed accented 8th notes. Focus on maintaining a clear distinction between accents and taps. Keep your taps low and controlled. Make sure your accents are strong, not wimpy. The tenor exercise is deliberately on one drum, so that the player can focus on the Y-axis motion and the fundamental accent/tap control.
Sections 3-4: Alternating accented 16th notes. This should follow the exact same technique as sections 1-2, except the opposite hand is now “filling in” the 16th notes. All taps should be consistently at the same height and volume. The tenors now move the accents to an adjacent drum. Keep the accents strong and the taps consistently softer.
Sections 5-6: Alternating 8th note flams. These sections are excellent for focusing on the three heights of accents, taps, and grace notes. The accents and taps should remain the same from the previous sections. The additional grace notes should be softer and lower than the taps. Once again, the tenors are deliberately on one drum in order to focus on the fundamentals of good flam technique.
Sections 7-8: 16th note paradiddles. These patterns get a bit trickier. Watch out for the sticking on measures 2 and 4! The key to these section is that they should sound the same as the 16th notes in sections 3-4. Do not let the “diddle” part of the paradiddles sound weaker or stronger than the singles you played in sections 3-4.
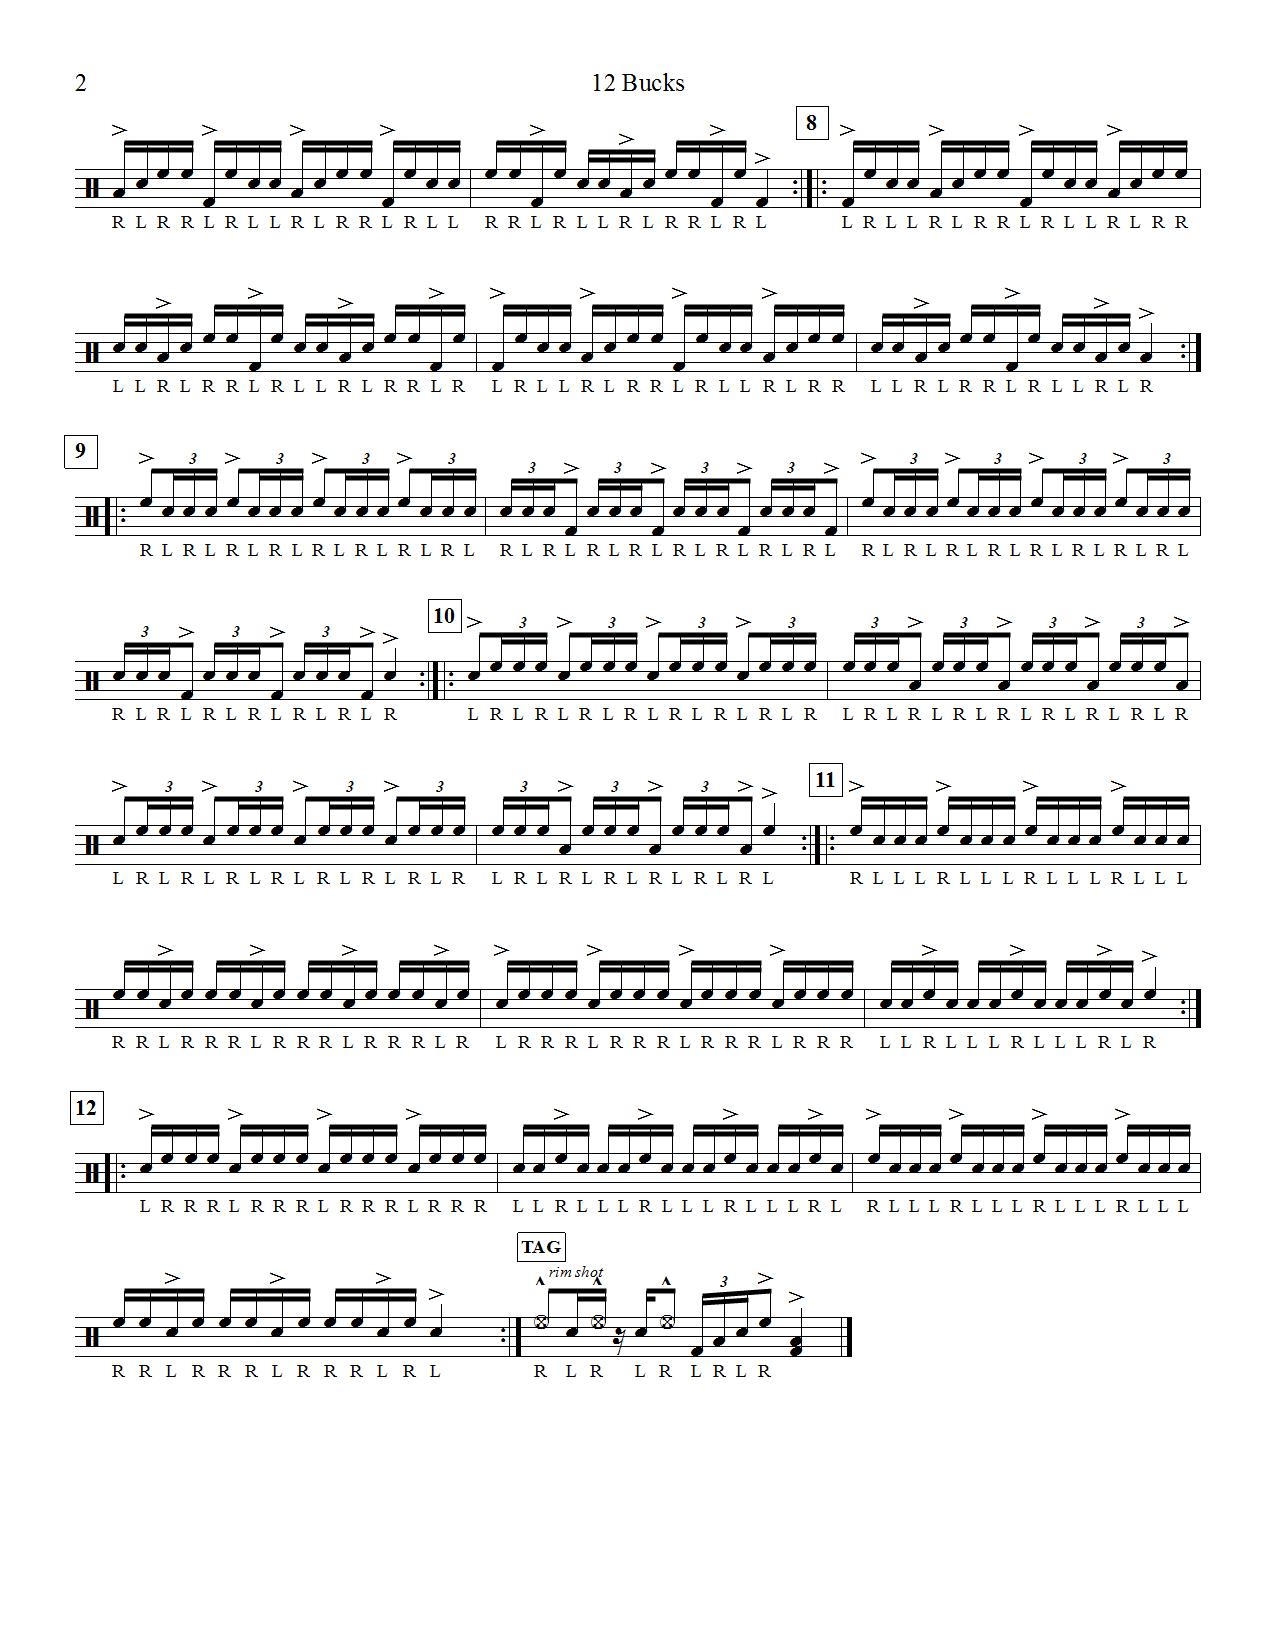
Sections 9-10: Single stroke fours and single stroke sevens. These rudimental patterns get your hands moving a bit quicker with the 16th note triplets. They also require more precise timing focus. Many drummers have a tendency to “cheat” the length of the initial 8th note by starting the triplet too soon. Of course, you should practice the whole exercise with a metronome, but this section would especially benefit from doing so.
Sections 11-12: “RLLL” quad groupings. Once again, the 16th notes patterns should sound the same as sections 3-4 and 7-8. Of course, these sections require more finger control in order to move each hand at the speed of 16th notes.
Tag ending: A final syncopated measure to cap off everything! Notice that the snare and tenor triplet rhythms are slightly different. The tenors start on the downbeat, while the snares conclude on the upbeat. Both parts should be played precisely in time in order to hear the tradeoff between sections.
Have fun learning these patterns. Once you have them down, be adventurous and create your own variations!
*[Yes, I know there are technically 15 keys, but I’m not going to get into that debate right now.]
Last time, we looked at three levels of flam exercises. Here are three more, but these are considerably more advanced. They all follow the same accent “skeleton” from the previous set of flam exercises.
The first exercise utilizes rudiments often called triplet pataflaflas (though used as 16th notes in this exercise), flam tap paradiddles, and pataflaflas (that is, the regular kind). A regular pataflafla is a group of four notes with a flam on the first and last note, and a triplet pataflafla is a group of three notes with a flam on the first and last note. A flam tap paradiddle is a normal flam paradidle with a flam on the third note creating a flam tap on the “diddle” half of the paradiddle.
The second exercise is a true coordination challenge. Essentially, the exercise is the same as the Level 2 exercise from last time, but the flams now follow immediately after the accent. The rudiments all fall into the “unofficial hybrid” category, so their names vary from place to place. Some names commonly given to these rudiments are dachudas (or tuchadas) and inverted tap flams. (I’m unaware of a name for a paradiddle with a flam on the second note. If you have a name for it, I’d love to hear it. Please share it in the comments!)
The third exercise uses three fairly common rudiments—flam drags, flam ratamacues, and flam accents. However, the way these rudiments are combined make it difficult to take this exercise very fast. Only advanced players will be able to execute this exercise cleanly at tempos above the 132 bpm range.
Best wishes on learning these! As always, make your accents strong, and keep your grace notes low and controlled!
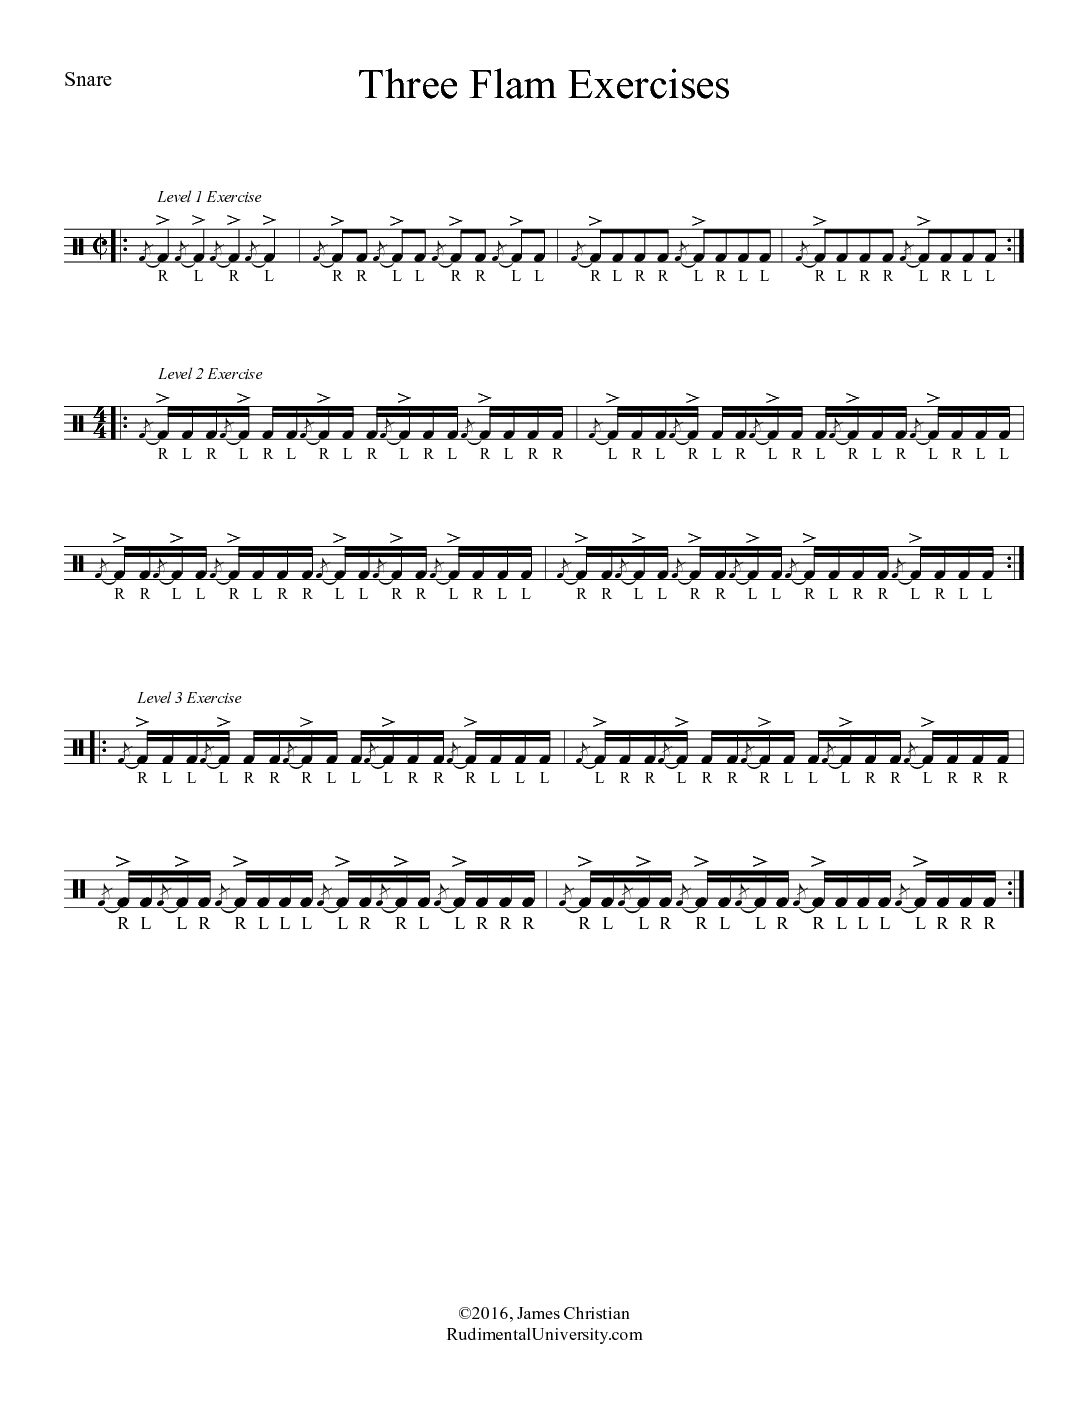
Three levels of snare exercises are presented here:
The first level focuses on basic flam rudiments—the flam, the flam tap, and the flam paradiddle. It’s a great exercise for younger players. Use the single flams to focus on great flam spacing, then utilize the same foundational motion to lead into the flam taps. (A flam and flam tap are very similar; simply add an extra note after the initial flam.) The transition between flam paradiddles is the same as the double in a flam tap, so each of the three rudiments build off of each other. The exercise is written in cut time to emphasize that it can be taken in a faster “two” feel once you feel comfortable with it. For young players, however, it would be better to start it in a slow 4/4. Once this exercise is solid, you can move on to the second level.
The second level exercise also utilizes flam taps and paradiddles, but flam accents are heavily incorporated in the first two measures. These three rudiments are the most common flam rudiments, and being able to play patterns like this is an important skill to achieve for any snare drummer or percussionist. (Note: This second exercise is not original with me. I played it regularly in my high school drum line under the instruction of Rick Beckham. It’s a really good exercise though, and it’s worth passing along.)
The third level exercise follows the same accent pattern as the previous exercise, but the coordinative complexity is increased. All of the flam rudiments are inverted lead-hand switch patterns. The flam taps are now inverted flam taps. The other patterns don’t have names that are universally agreed upon, but I like calling them inverted flam accents and inverted flam fours.
All of these exercises are good tests of flam coordination. As you practice them, always keep the grace notes low and close to the drum head. Make a distinction between accented and non-accented notes. As always, make sure your flams are consistent with proper spacing.
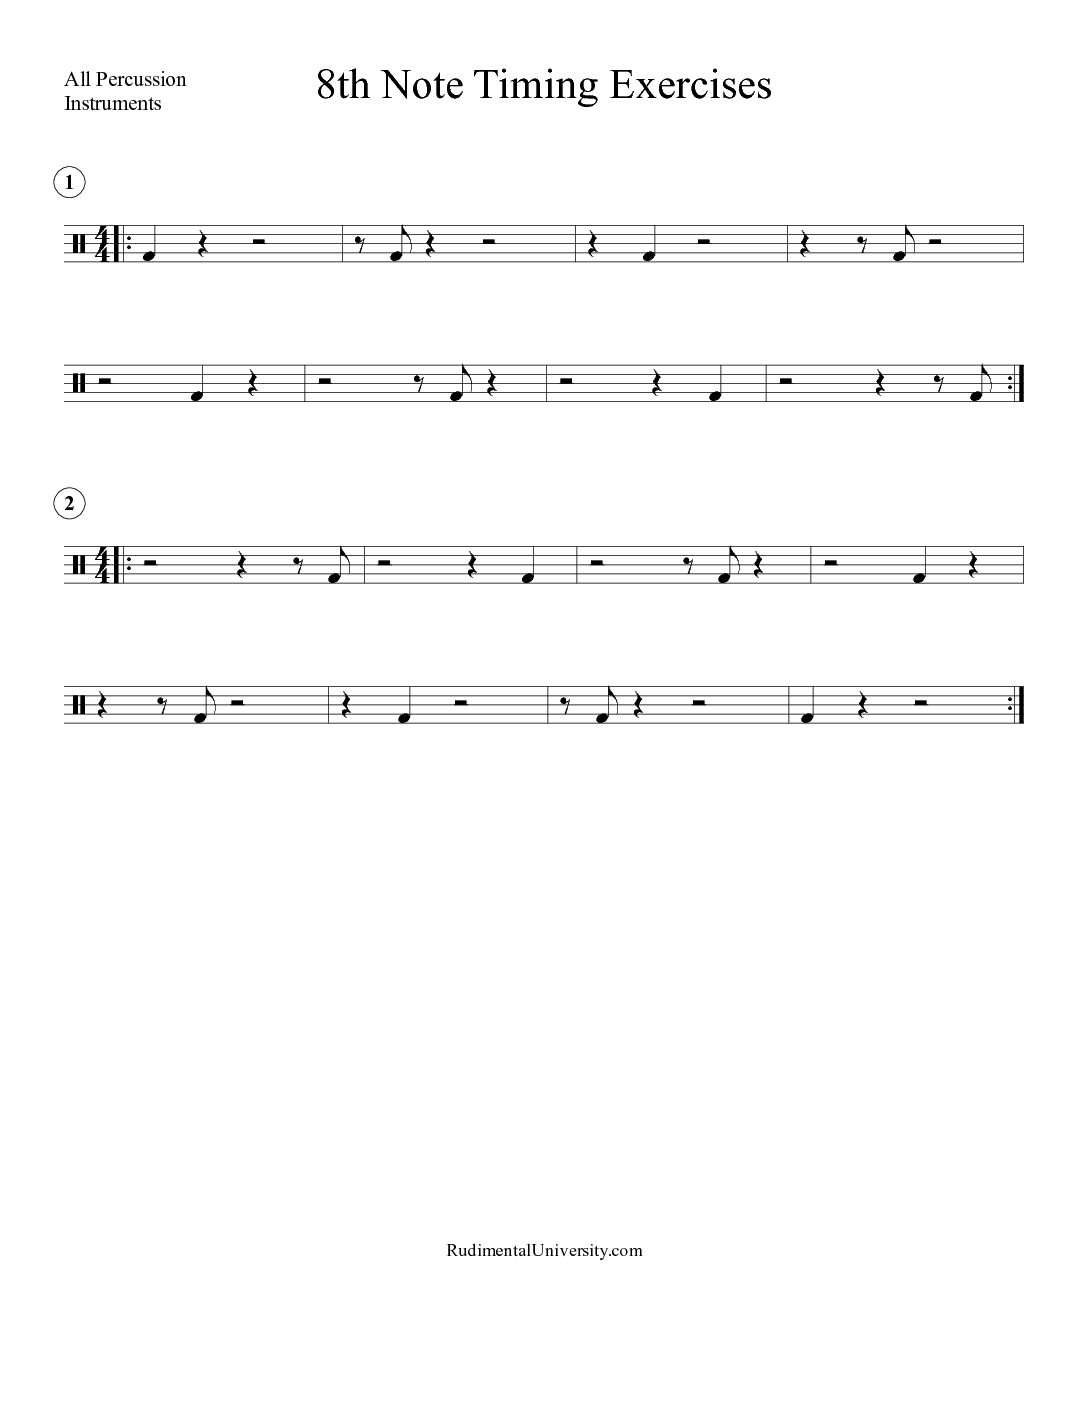
These two timing exercises are quite helpful for all percussionists, regardless of your specific area of specialty. They seem simple at first, but they really great exercises for getting an ensemble to internalize the pulse together. They are also useful exercises for individual practice (with a metronome, of course!). They will help you realize how accurate or inaccurate your internal beat subdivisions are. This becomes especially evident at extremely slow and extremely fast tempos.
I should state upfront that I did not write these two exercises, but I like them, and I wanted to share them here. I helped teach at a high school drum line camp a couple of years ago, and Luke Holt was the front ensemble technician. He brought out these exercises during the full drum line rehearsal (I’m not sure if they were original with him, but they’re worth passing along). With all of the space created by the rests, it was a challenge for the entire group to play every note perfectly together.
I have since used these exercises at times to help my percussion group in the same way. They are particularly good for bass lines, since each individual player often has isolated rhythms like this.
For individual practice, I highly recommend using a metronome with the eighth note subdivision turned on. You will probably be surprised how easily you tend to rush or drag certain notes in the measure. I would recommend practicing these exercises every so often at slow tempos (about 40-60 bpm or slower) and fast tempos (160 bpm or faster). If you can play these two exercises perfectly along the entire tempo spectrum, you can be pretty confident in your sense of eighth note pulse.
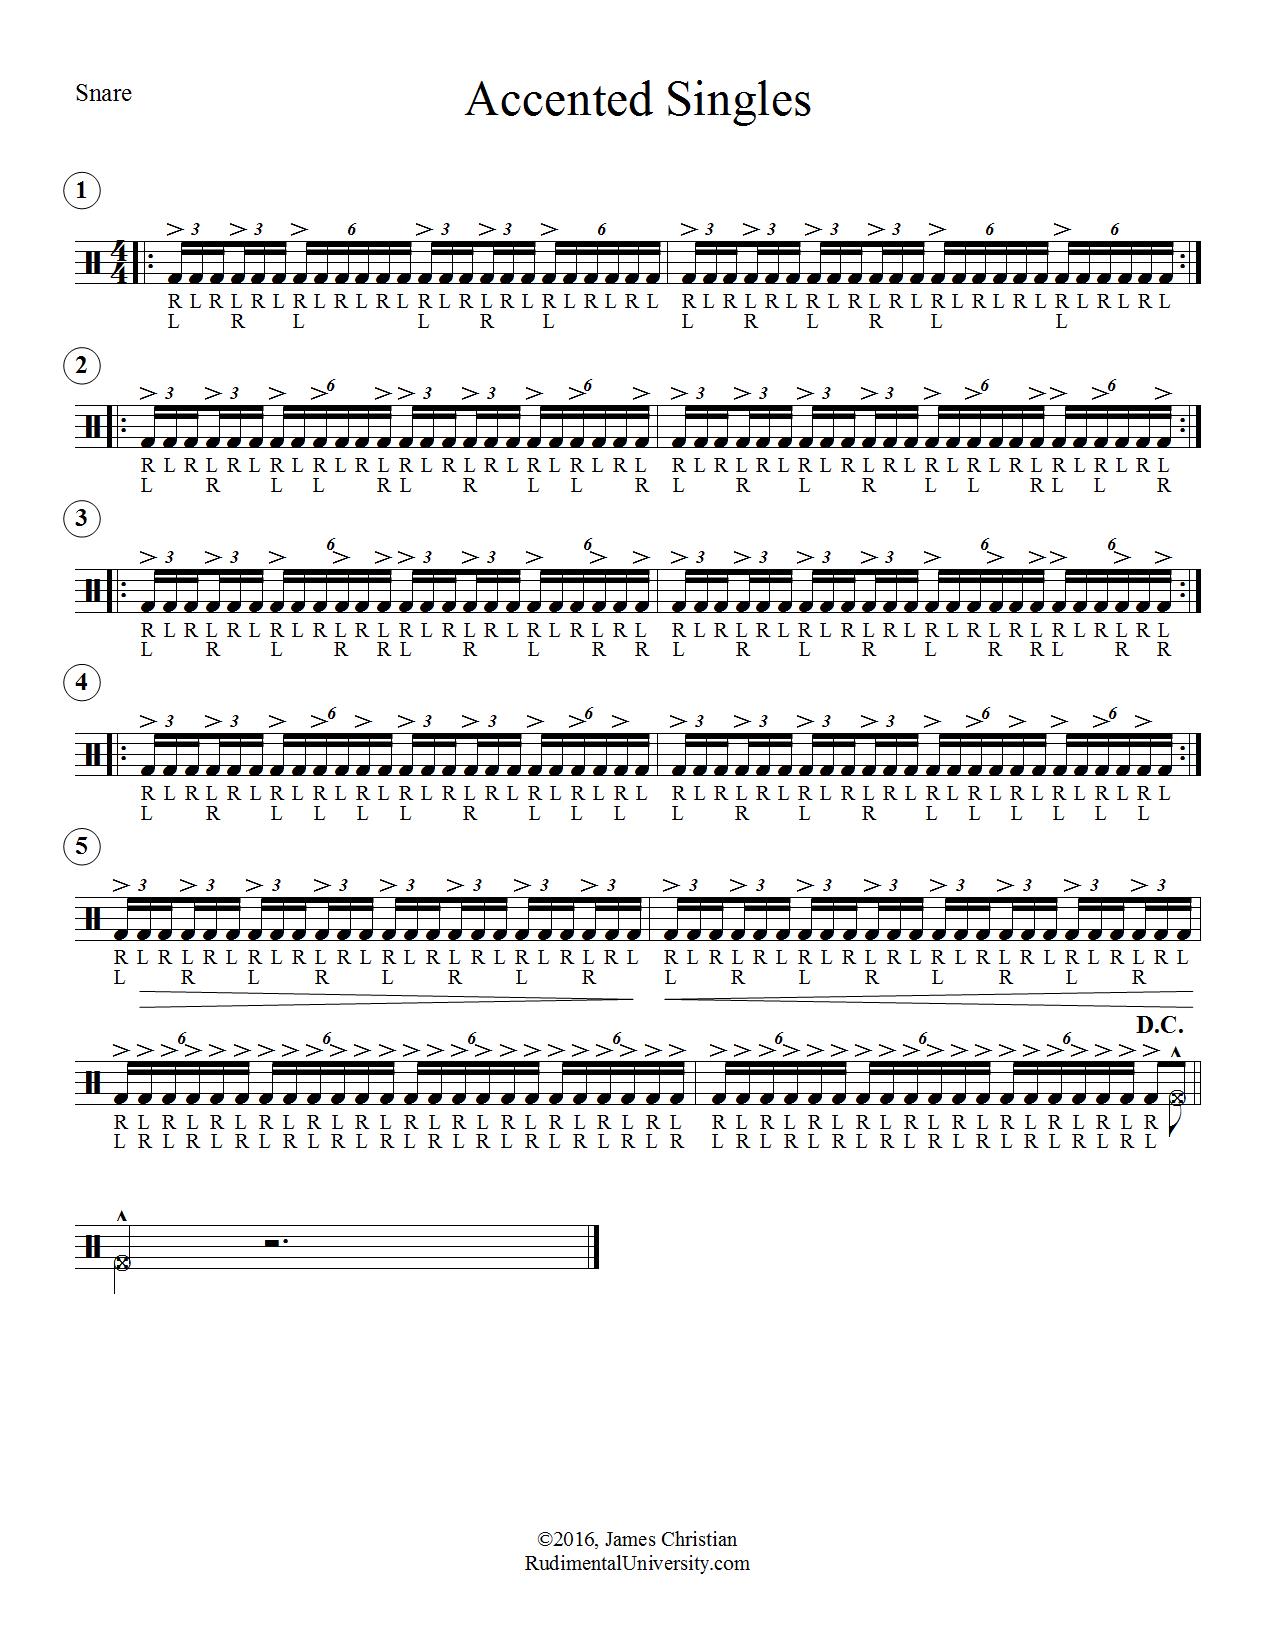
Accented Singles: One of the Best Things You Can Practice for Any Percussion Instrument
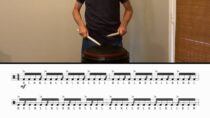
If you want to get the most bang for your buck in practice sessions, devote regular time to working on your accented singles. I think this exercise is extremely helpful for all percussionists, whether you play snare drum, keyboards, timpani, drum set, congas, or anything else.
Why is this exercise so great? Because singles are the foundation of everything. If you can’t play fast singles and control them with accents, then you’re going to have a hard time playing anything else very well. But if you take time and develop your singles, then everything else flows from that foundation.
This exercise has five sections; #1-4 repeat, and #5 adds a final endurance element. If you are a younger player, I would highly recommend playing just #1 over and over again (like for a month or two) until you have it sounding really good and up to a tempo of 100 bpm on the metronome. If you are already at that level, then the remaining sections provide some extra challenges with accent control and pure endurance.
At the end of the exercise, you will notice there is a “D.C.” marking—which, of course, means to go back to the very beginning and play the entire exercise again. On the second lap, follow the bottom sticking. The first time through the exercise, you will play everything with right hand lead, and the second time through, you will play everything with left hand lead. At faster tempos, this thing is a workout!
One important note about the accents: Play them! Few things sound worse than weak accents. Make a clear distinction between your accents and taps. For optimal speed, keep your taps low and close to the drum head. Take care to bring out every accent so that the rhythm is clear.
I believe it’s vitally important to practice this exercise on a single surface, such as a snare drum, because the up-and-down motion is a vital skill to master. Once you can play it well on one surface, you may want to practice it on other percussion instruments, such as multi-tenors, timpani, drum set, or keyboards. You can practice by keeping the taps on one surface and moving the accents to another surface. (You could also do the same with the rims on a snare drum.)
Finally, playing accented triplets is especially important because you have to alternate hands, and you end up working both hands equally. I would recommend adding this exercise (at least #1) to your daily practice routine. Over the course of a few weeks, you should see significant improvement on snare drum and all percussion instruments that you play.
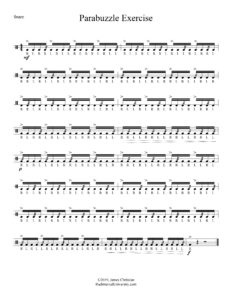
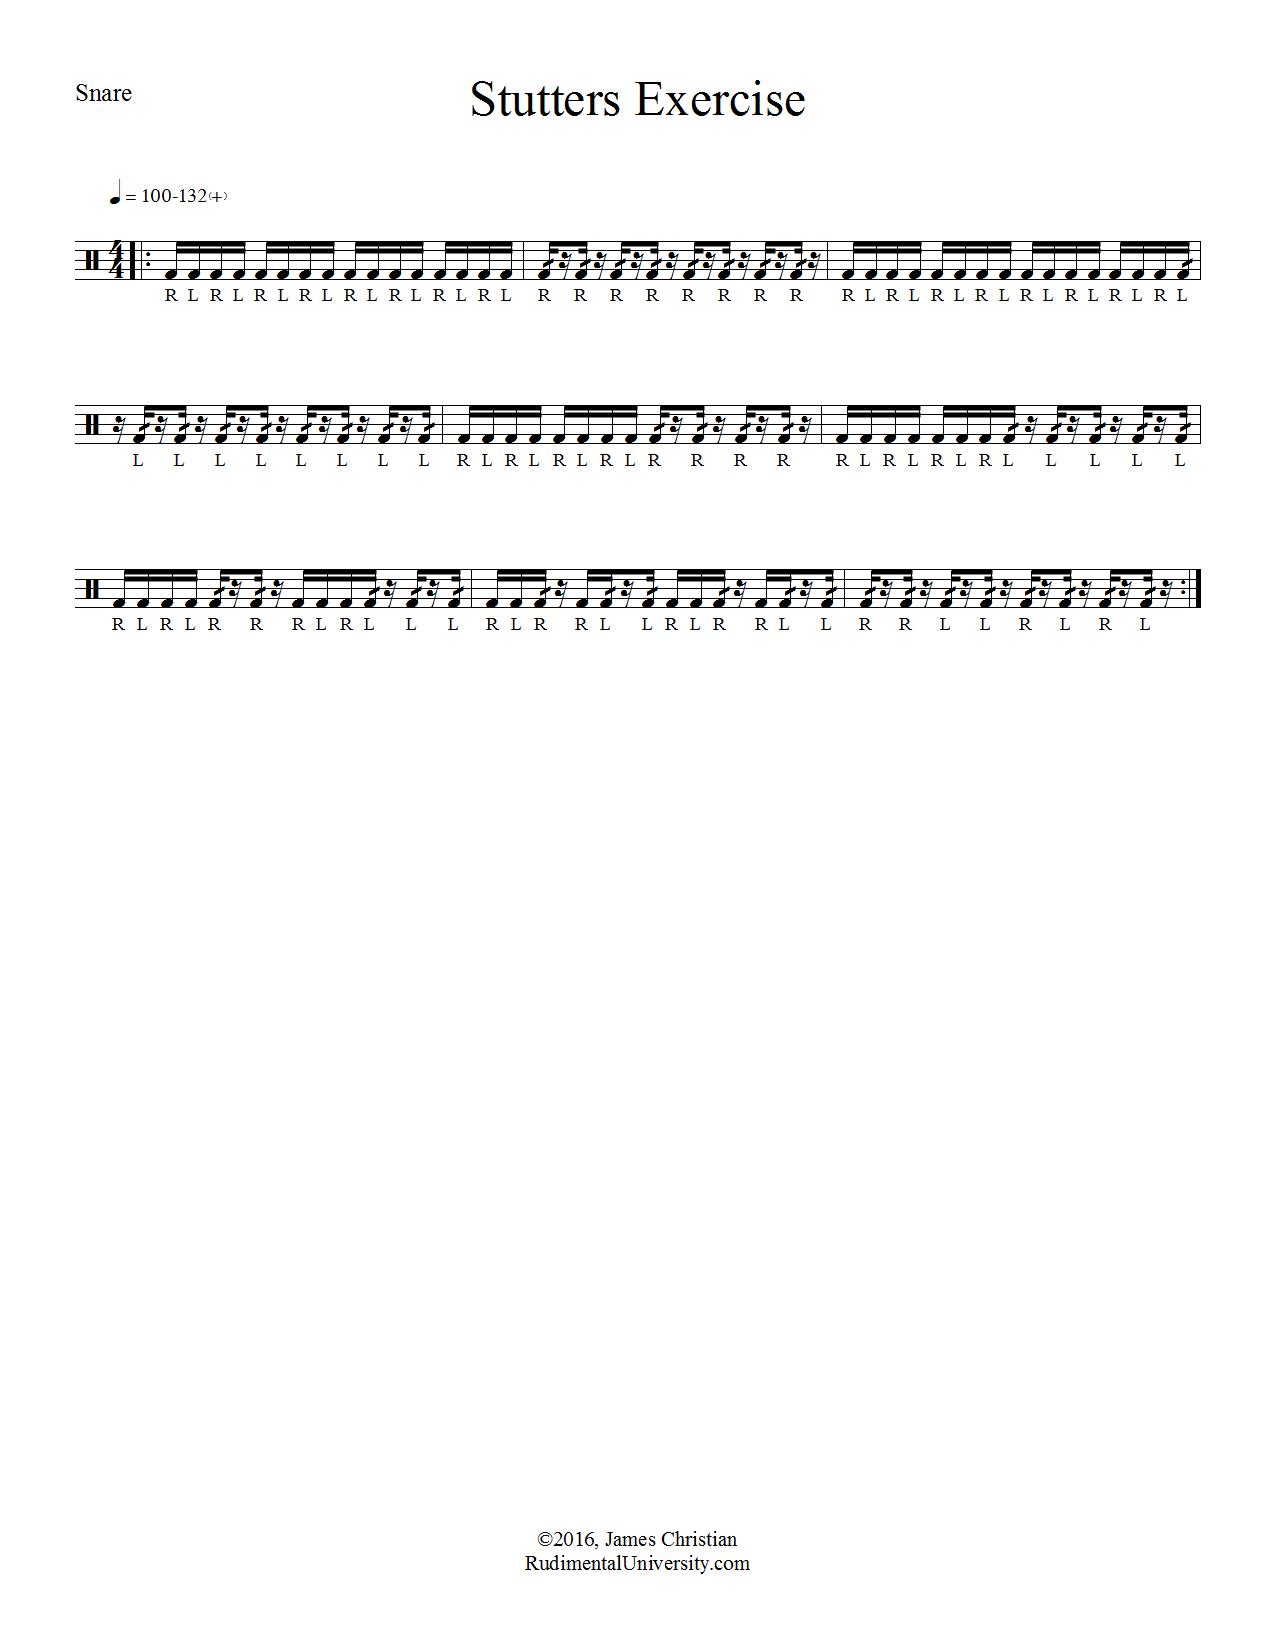
I’ve got a brand new snare exercise for you today. I came up with it several years ago just for fun. It has been in my “private collection” of exercises that I use sometimes for individual practice and one-on-one with students, but I’ve never shared it anywhere before now.
This exercise focuses on stutters—that is, isolated diddles. These have a cool “stuttered” sound (hence the name), but they are also really good for focusing on your diddle quality between each hand. The 16th note check patterns help to keep your timing in check. Be careful to keep each “stutter” in time. If you play this with other people, it will be a really helpful exercise for checking that your diddle interpretation is the same. The last measure is particularly tricky to play cleanly with others. Happy stuttering!
Throughout the week, we will feature exercises for different percussion instruments. Here is our first exercise for snare drum. It utilizes paradiddles and three paradiddle variations—inverted paradiddles, single mills, and alternating quads. These last three rudiments have been around for a while, but they have never quite gained the same popularity as their grandfather, the single paradiddle. Nonetheless, they are all quite versatile, and they make for a fun exercise.
As you play this exercise, pay careful attention to distinguish between your accent and tap volumes. As the tempo increases, the more difficult it is to bring out the accents, especially on the alternating quad.
A fun variation on this exercise is to play it with zero accents. Make it sound as smooth as possible. As you get it faster and faster, it should sound like a smooth roll.
Check back here regularly. We will look at different applications of this exercise on various percussion instruments throughout the week!