Multi-Tenors Exercise: Helicopters, Butterflies, & Figure Eights

Click on the image to enlarge or click here to download in PDF format.

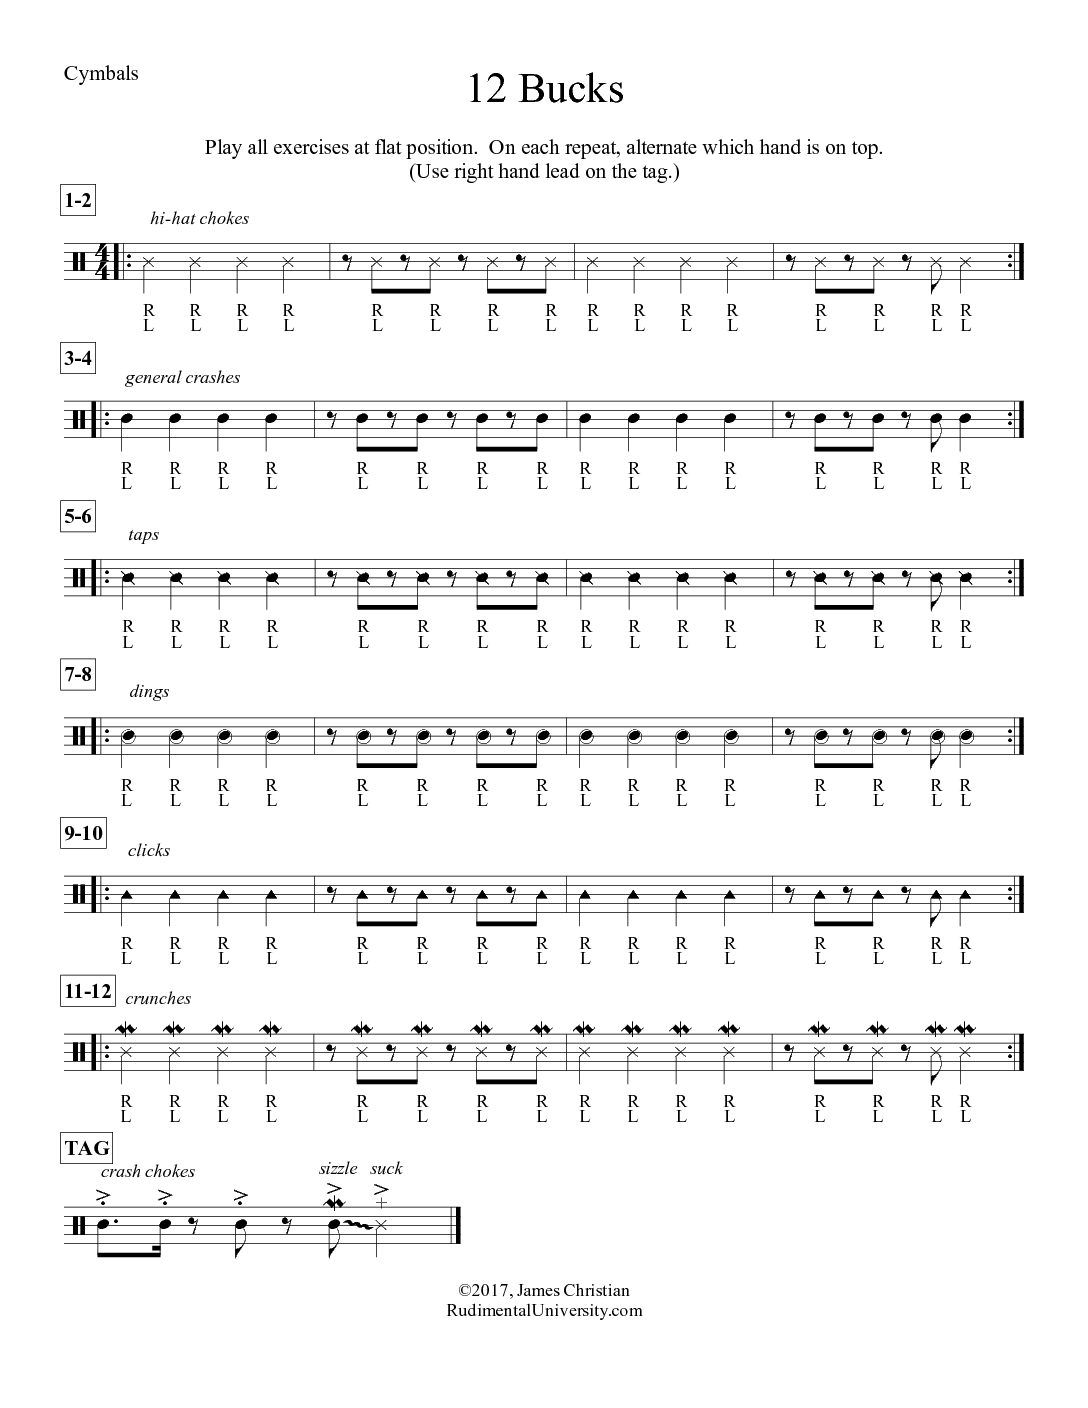
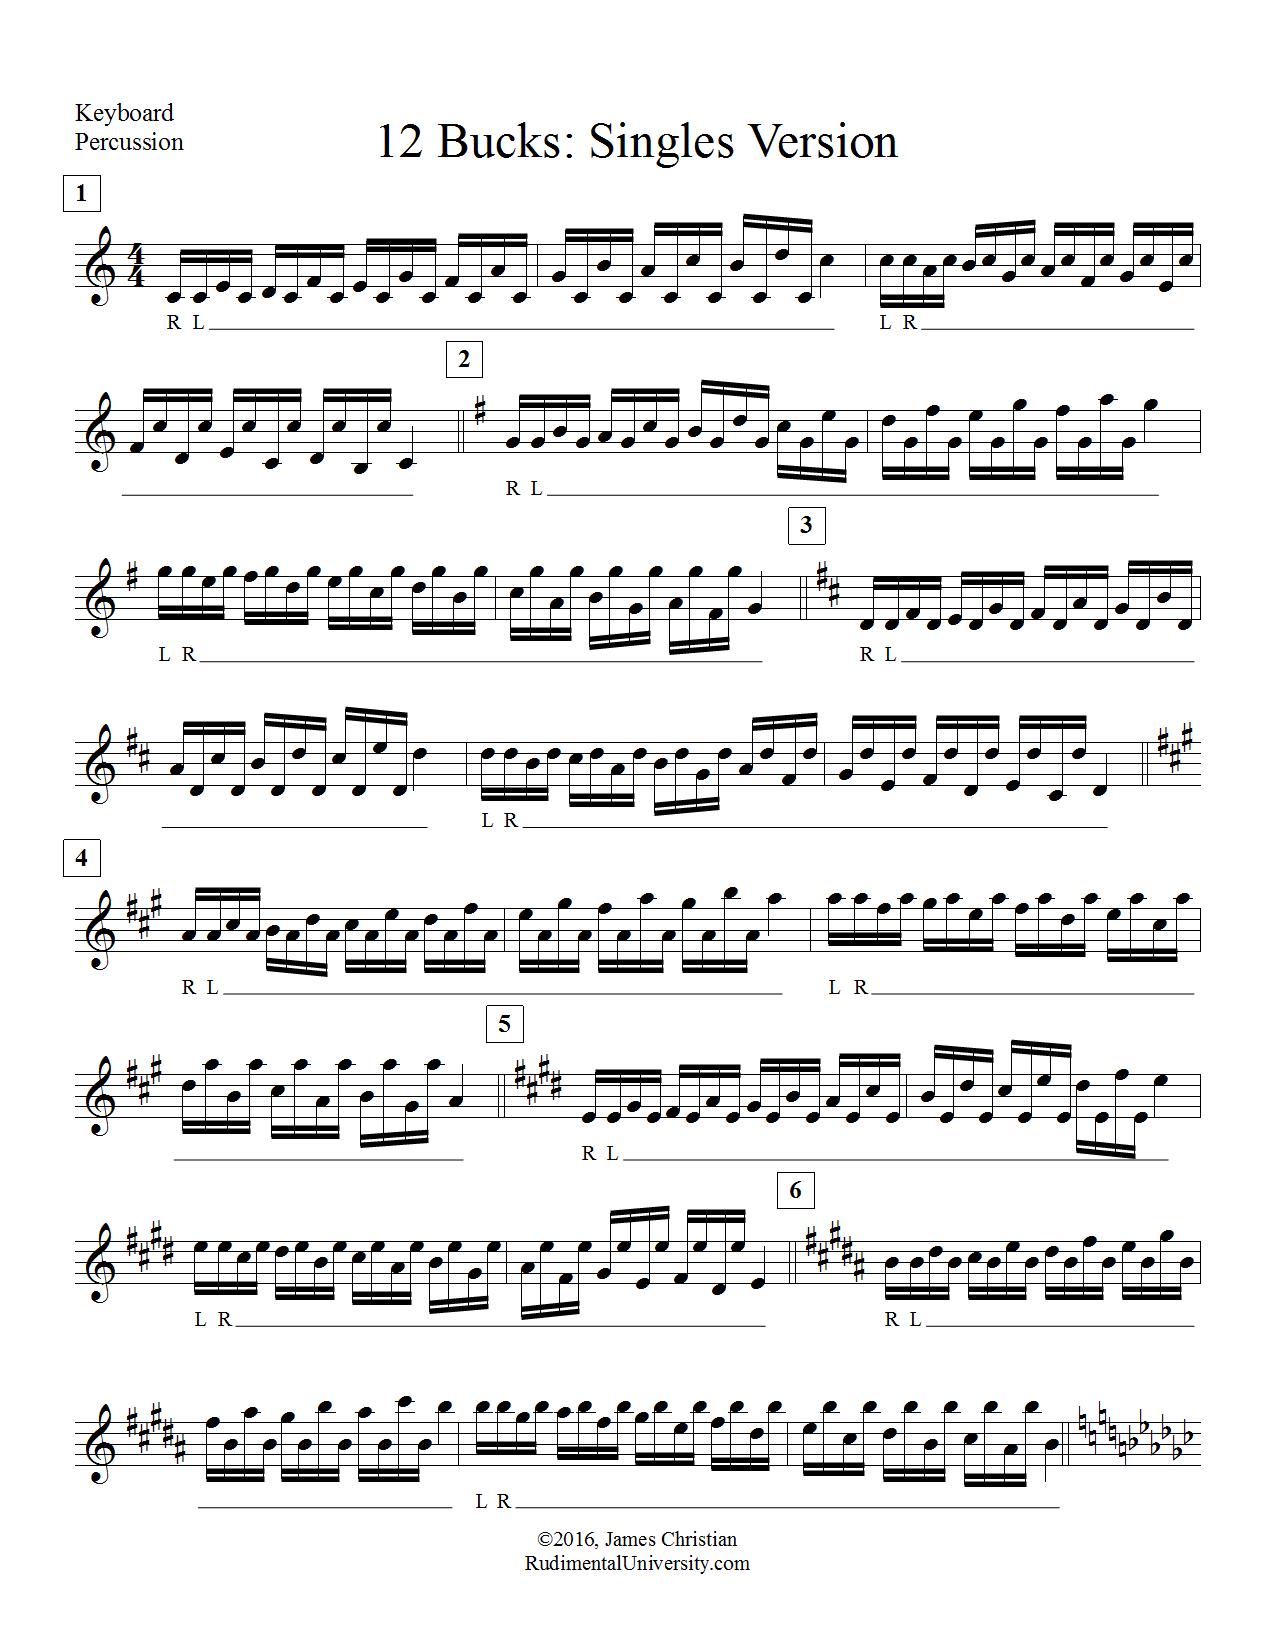
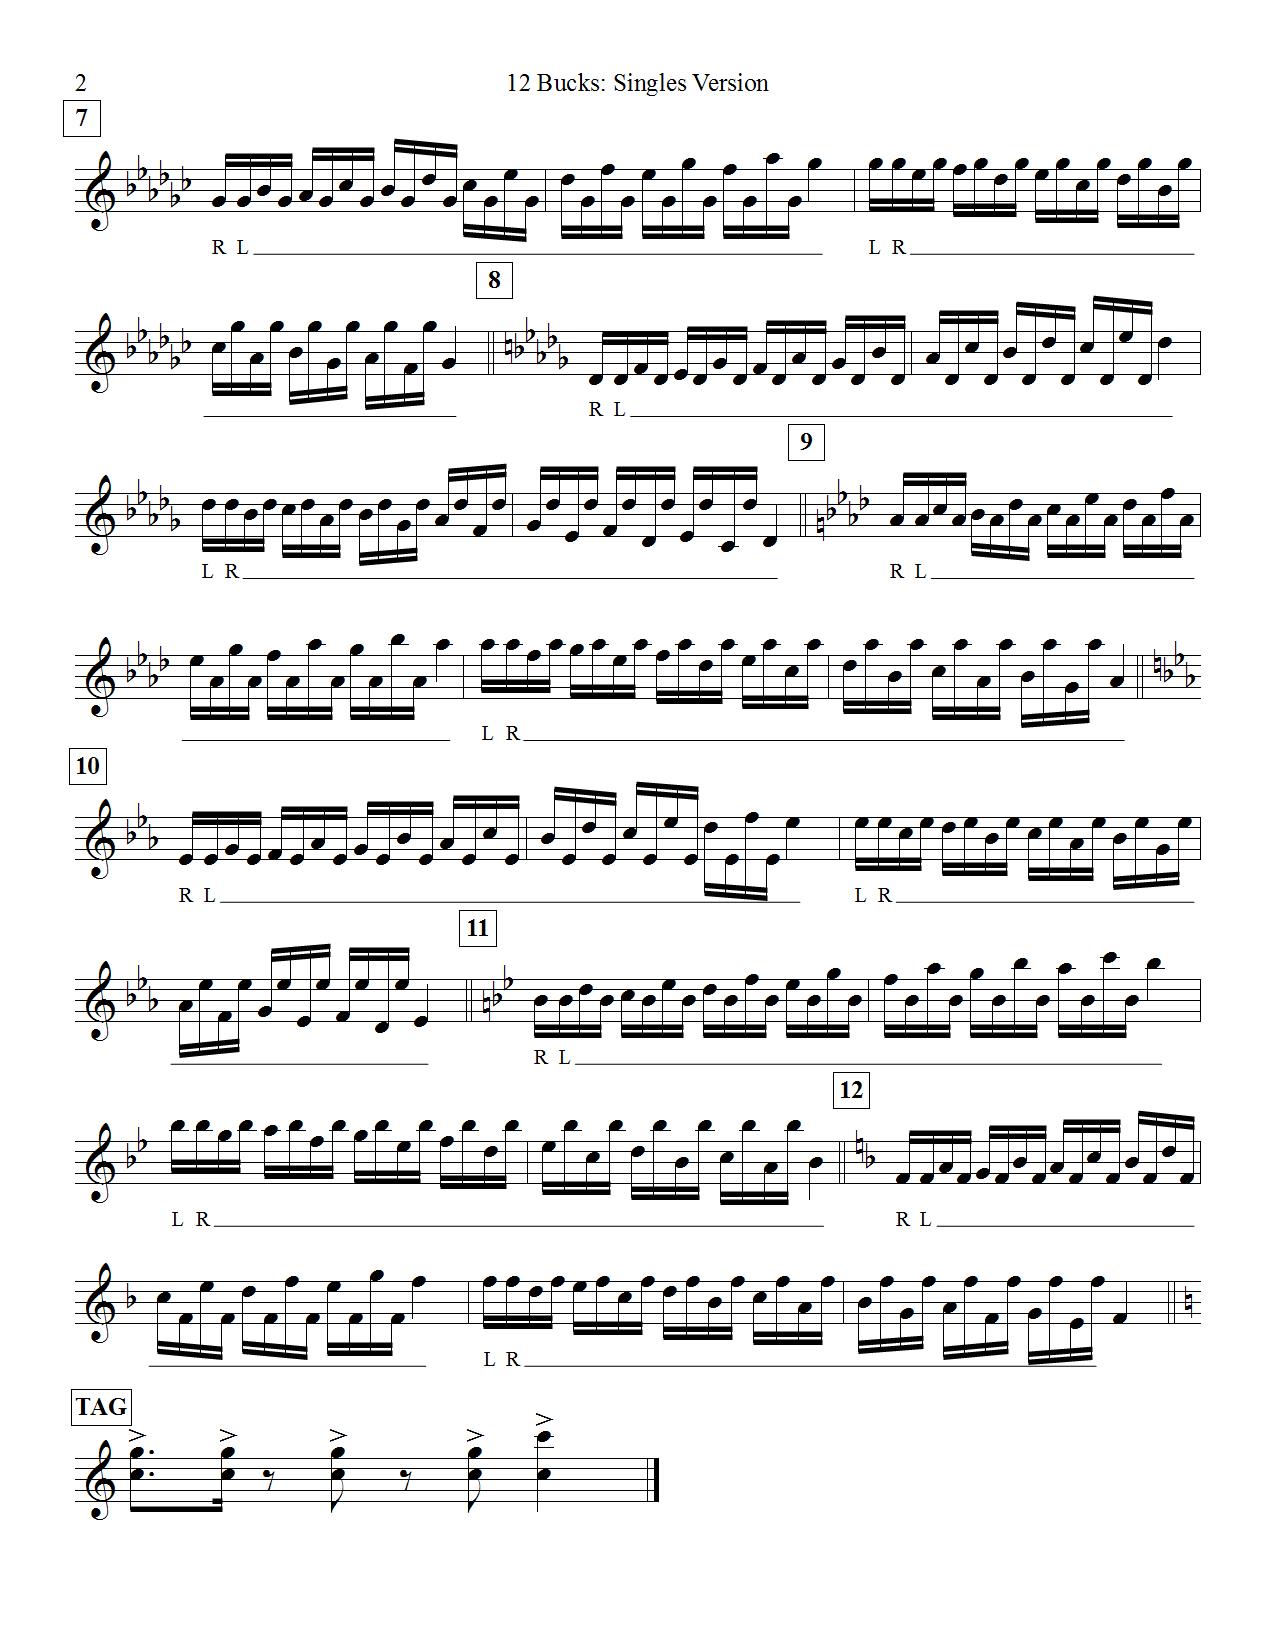
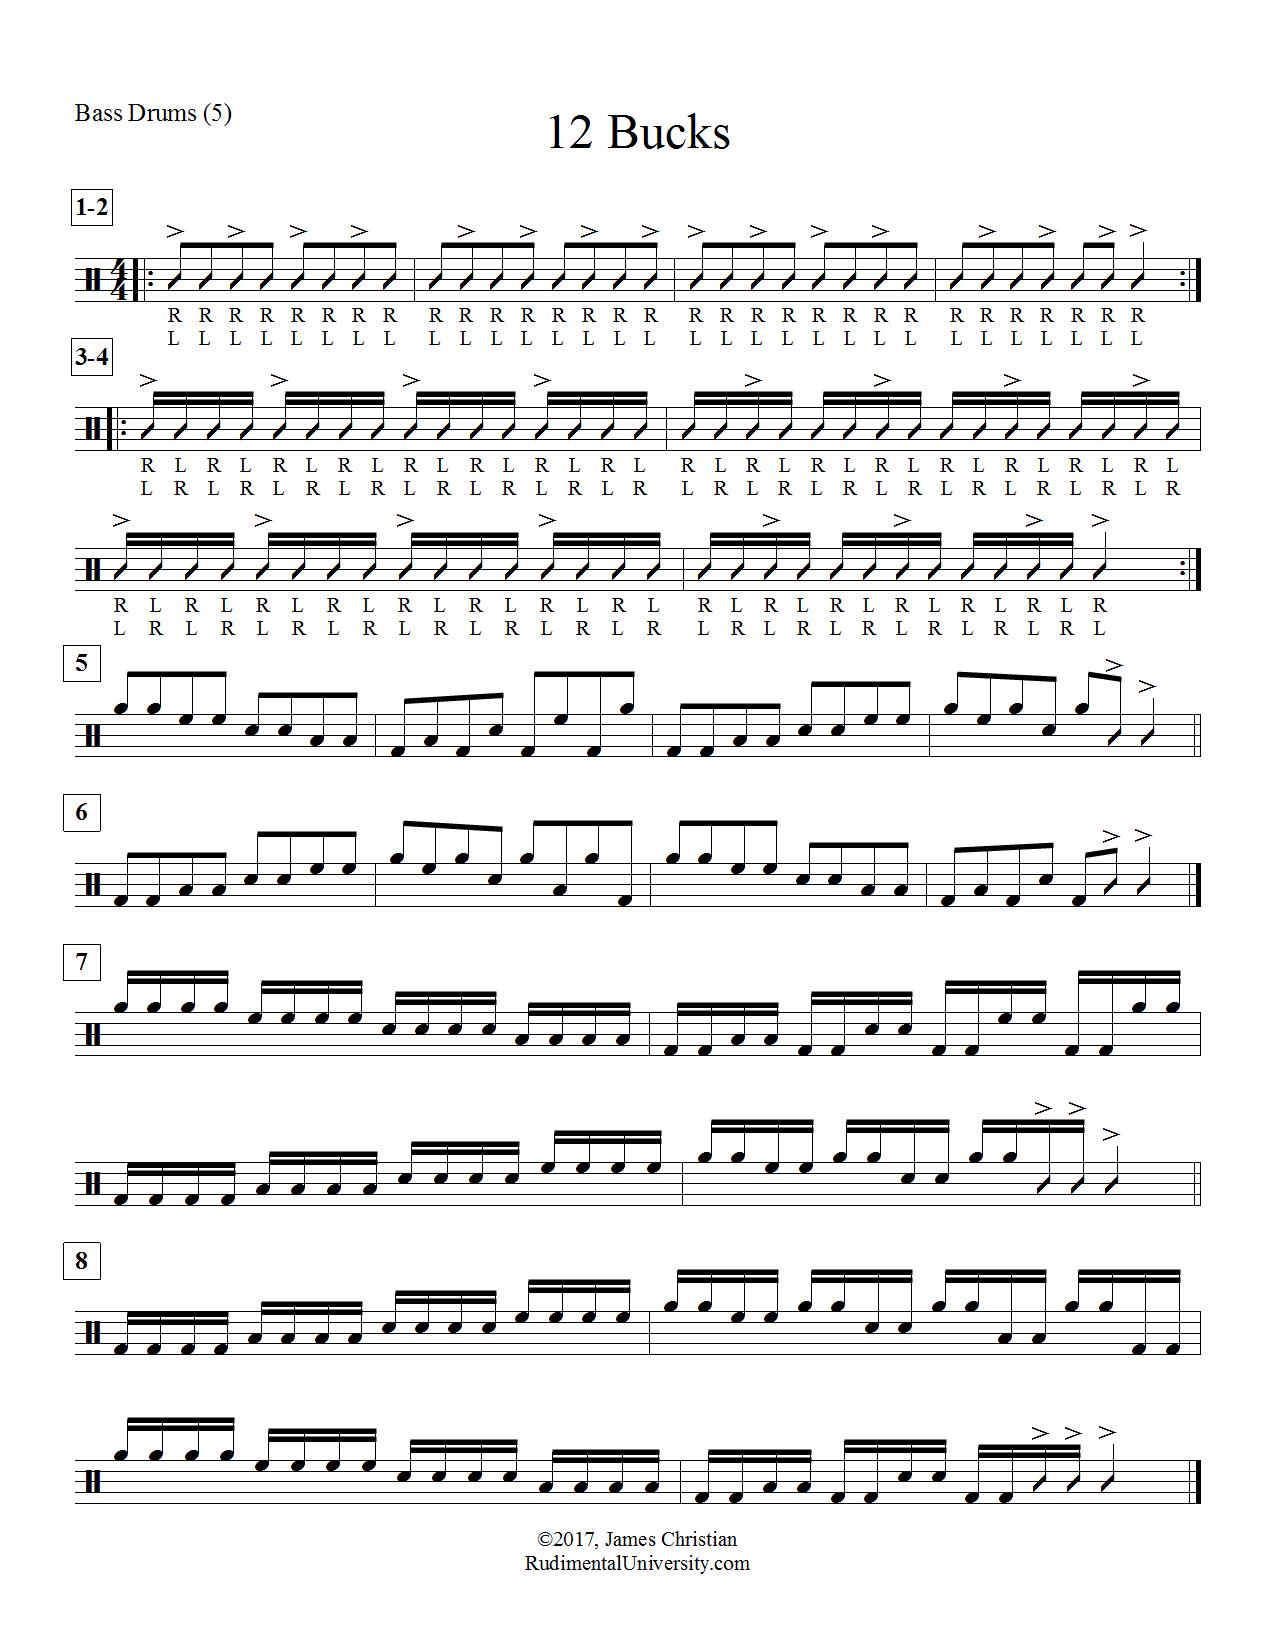
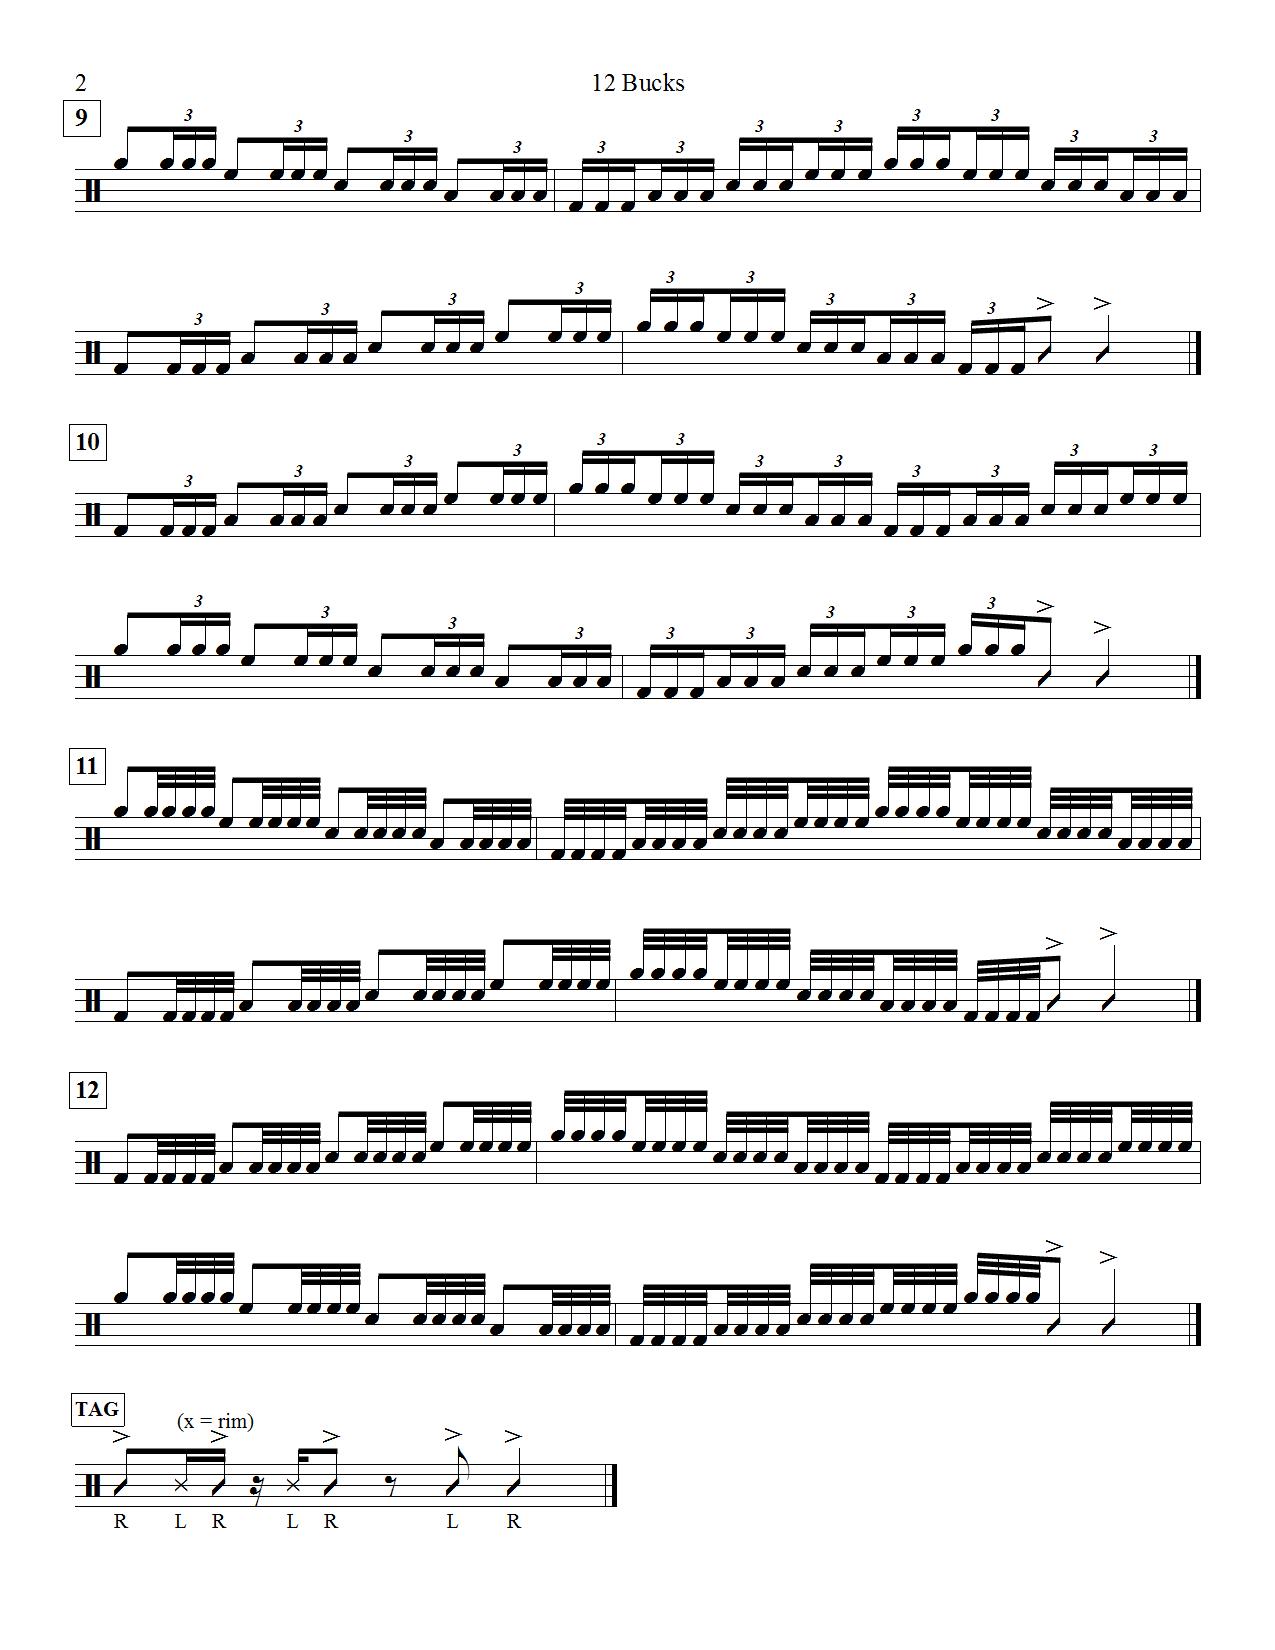
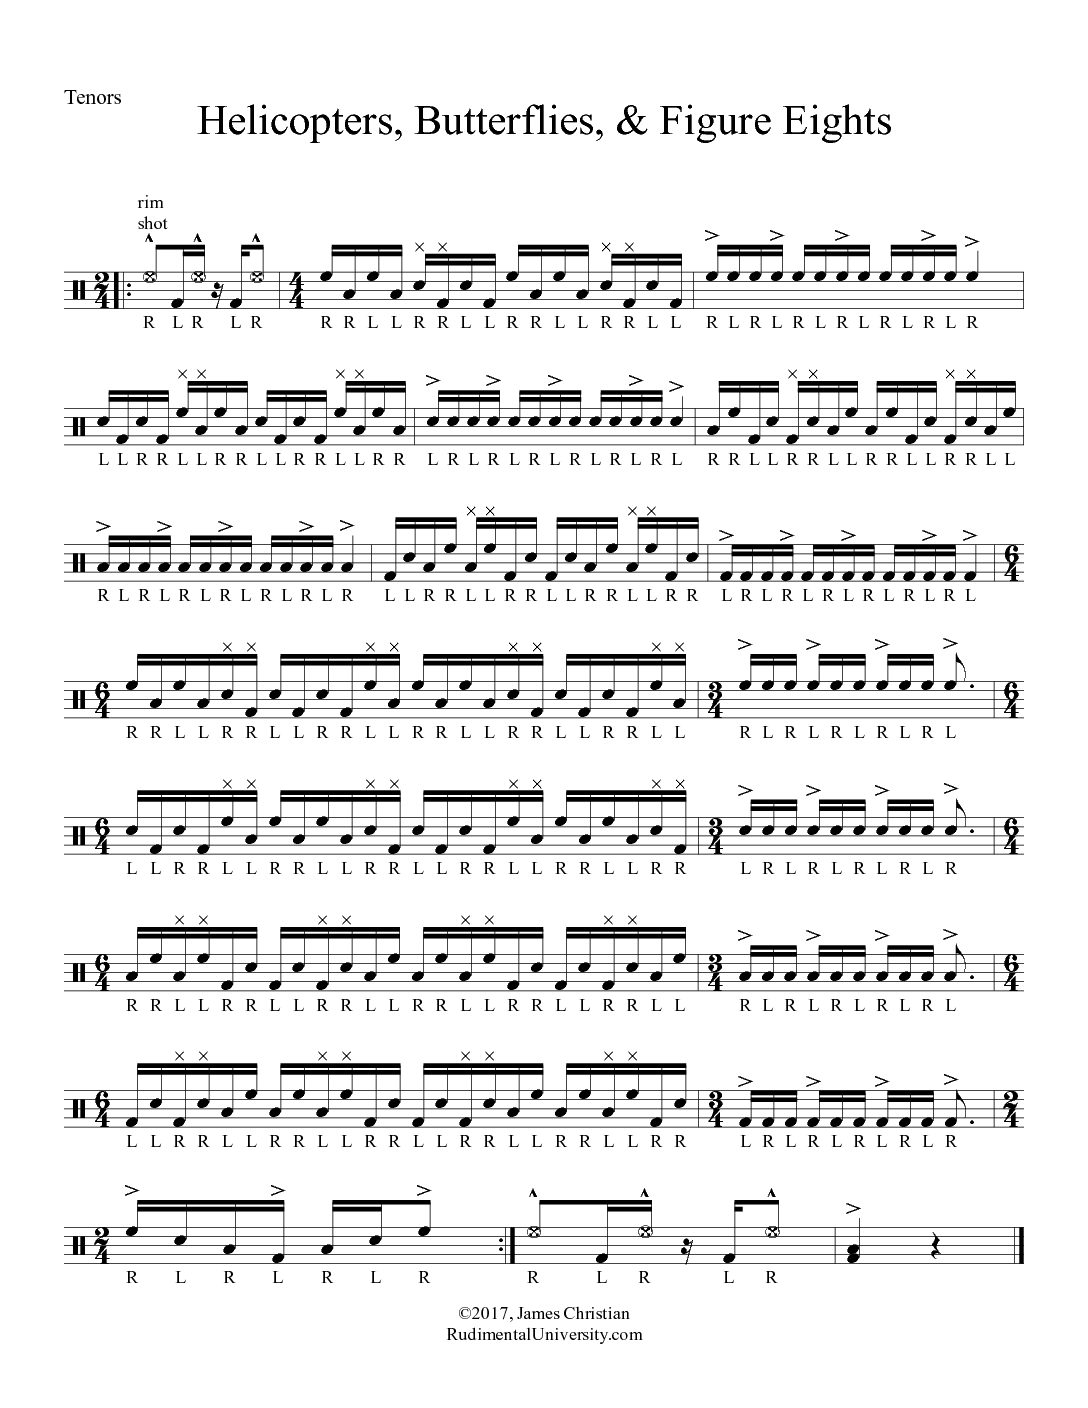
Here is a new exercise for marching tenors that focuses on the three most common crossover sweep patterns:  helicopters, butterflies, and figure eights.

In case you are unfamiliar with these terms, helicopters are found in measures 2 and 4.  Butterflies are found in measures 6 and 8.  Figure eights are found in measures 10 and 12.  The final pattern, found in measures 14 and 16, is not as common, but it makes logical sense in the context of this exercise.  I call the pattern inward figure eights.  With all of these patterns, they are presented first with right hand lead and then with left hand lead.

All these sweep patterns are based on the visual “picture” created from their movement when played rapidly.  Helicopters look a bit like helicopter blades moving.  Butterflies create sort of a butterfly wing shape.  Figure eights create an “8” shape.  Inward figure eights follow the same motion, but the sweeps move inward instead of outward.

The measures that do not contain sweeps are meant as a groovy check pattern.  I find the accent and rim shot patterns more fun to play than a measure of straight singles (or something similarly basic).  I suspect most readers will enjoy them more as well.

This exercise is great for all ability levels.  Beginner players will want to take each measure very slowly in order to learn these patterns.  You may need to start around 80 beat per minute (bpm) on the metronome.  Advanced players may be able to treat the exercise in more of a double time fashion, playing in a tempo range of 240 bpm—or faster!

As always, focus on proper playing zones.  Avoid rim clicks and aim for 100% accuracy.  Maintain even sounding doubles, so that both notes are of equal volume.  Enjoy!

How to Play 24th Notes, 40th Notes, and More!


Do you know how to count 24th notes, 40th notes, or 48th notes? James walks you through some terminology that may just revolutionize your understanding of rhythm.  The following is a modified transcript of the video above:


***************************

Hello, everybody. This is James Christian with RudimentalUniversity.com.

Today I want to talk about rhythm terminology. Most musicians don’t frequently deal with this particular concept I’m going to discuss, but drummers and percussionists deal with it all the time.

We’re used to whole notes, half notes, quarter, notes, 8th notes, 16th notes, etc.  And we also have tuplet patterns, such as half note triplets, quarter note triplets, 8th note triplets, 16th note triplets, and so forth. In this article, I’m going to talk about the way we discuss tuplet patterns and how we can make it a little bit easier.

This method is especially easier when you’re writing on the Internet and typing.  It also makes your terminology more consistent, regardless of the type of note you’re discussing. When you’re writing, this method will save space, and it’s just a nice shorthand for your terminology.

So here it is… Read more “How to Play 24th Notes, 40th Notes, and More!”

Crash Cymbals Exercise: 12 Bucks

Click on the image to enlarge or click here to download in PDF format.

Today marks the first crash cymbals exercise on Rudimental University!  In just one exercise, the player cycles through a variety of techniques.  This is a really good warm-up for working through some of the most common cymbal effects.  As with all the “12 Bucks” exercises this week, this exercise can be played in individual practice, and it can also be played with other percussionists on other instruments.

The exercise is divided into 12 sections comprised of six “pairs” (1-2, 3-4, 5-6, etc.).  The first time through each section, play with the right hand on top.  On the repeat, flip the cymbals so that the left hand is on top.  Many cymbal players and cymbal lines do not work both hands evenly, but I ask… Why not?  When both hands are equally strong, you have many more options when it comes to performances.

The same rhythmic structure is used throughout the exercise (except for the “tag” at the end).  If you are unfamiliar with extended crash cymbal techniques, there are a few resources online that explain them quite well.  Unfortunately, the terminology varies wildly from instructor to instructor.  I did come across the Oregon Crusaders’ cymbal line packet, and the techniques are all explained quite well in it: http://oregoncrusaders.org/wp-content/uploads/2015/02/OCP-Cymbal-Technique-Book-20151.pdf  (Note: what they call “smashes” are what I call “crunches.”  Everything else is the same.)

Here is the breakdown of the techniques:

  • Sections 1-2:  Hi-hat chokes
  • Sections 3-4:  General crashes (you can either push the top cymbal in a downward motion or away from your body—your choice)
  • Sections 5-6:  Taps
  • Sections 7-8:  Dings
  • Sections 9-10:  Clicks
  • Sections 11-12:  Crunches (a.k.a. Smashes)

The tag utilizes crash chokes and sizzle-sucks.

I personally find this a fun exercise to play.  It provides good audio/visual variety, and it keeps you on your toes.  Happy crashing!

Timpani Exercise: 12 Bucks

Click on the image to enlarge or click here to download in PDF format.

This exercise is a good warm-up for practicing tone quality and pedaling changes.  It goes through the circle of fifths, and each section incorporates the tonic and dominant of the key.  Like the other “12 Bucks” exercises this week, today’s timpani exercise can be played individually or with a group of percussionists.

This exercise can be played on three drums, but four will be easier.  The rhythms are not overly difficult, so it’s a good opportunity to focus on drawing a full tone from the drum on every stroke.  When playing with a group, you may want to use a medium hard mallet to produce slightly sharper articulation.

The main challenge on this exercise will be the pitch changes.  Gauges will certainly make the changes easier, but a well-trained timpanist can learn to “feel” the next pitch as he or she becomes more familiar with the specific set of drums used.  As always, use your ear and learn to adjust quickly, whether you have gauges or not.

Happy pedaling!

2-Mallet Keyboard Exercise: 12 Bucks (two versions!)

Doubles Version

Click on the images to enlarge…
…or click here to download in PDF format.


Singles Version

Click on the images to enlarge…
…or click here to download in PDF format.


Today you get a double dose of exercises!  Both versions cycle through the circle of fifths and utilize a thirds pattern, but the first version uses double strokes, and the second version uses single strokes.  Both are valuable to learn, and both work important skills.

As mentioned a few days ago, all the exercises this week can be played individually or together as a full drum line.  The snare part is similar to the common “Bucks” exercise, and the keyboard part cycles through 12 keys. Thus the exercise is called “12 Bucks.”

If you don’t know your scales and/or the circle of fifths very well, the main challenge on this exercise will be to switch between keys so quickly.  I would recommend starting with the doubles version.  You can initially learn it without the double strokes, and the technical demands will be slightly easier.  It really is a great exercise for helping you know the circle of fifths intimately.

Once you get the notes down, you can add in the doubles.  Then you can learn the slightly more challenging singles version.  When playing doubles, make sure both notes are of equal volume.  (Don’t “drop” the second note of the doubles.)  When playing singles, make sure you don’t add accents when they aren’t written.  With everything you play, work toward smooth, evenly spaced notes.

For more seasoned players, you may want to take the same exercises and play them with natural minor, harmonic minor, melodic minor, and/or other scale combinations.

Enjoy!

Bass Drum Splitting Exercise: 12 Bucks

Click on the image to enlarge…
…or click here to download in PDF format.


This fun bass exercise can be played with the snare and tenor exercises posted yesterday, or it can stand alone as a good splitting workout for five players.  As the title indicates, there are 12 sections, and each has a specific focus:

  • Sections 1-2:  Unison one-handed accented 8th notes.  Focus on maintaining a clear distinction between accents and taps.  Keep your taps controlled and close to the drum.  Make sure your accents are strong, not wimpy.  Matching stick heights and angles will help in staying together.
  • Sections 3-4:  Unison alternating accented 16th notes.  This should follow the exact same technique as sections 1-2, except the opposite hand is now “filling in” the 16th notes.  All taps should be consistently at the same height and volume.  Keep the accents strong and the taps consistently softer.
  • Sections 5-6:  Split 8th note patterns.  Focus on precise note placing.  Mentally subdividing the beat is essential.
  • Sections 7-8:  Split 16th note patterns.  Make sure the 16th notes are placed exactly in time, so that the transitions from player to player are smooth.
  • Sections 9-10:  Split 16th note triplet patterns.  Once again, take care to maintain precise note spacing.  Be careful not to “crush” or “stretch” the triplets.
  • Sections 11-12:  Split 32nd note patterns.  As the note speed increases, technique becomes even more important.  Maintain control without becoming rigid.  Stay relaxed without becoming sloppy.  Take care to achieve clarity on every single note.

Happy splitting!

Snare & Multi-Tenors Exercise: 12 Bucks

Snare Drum

Click on the image to enlarge or click here to download in PDF format.

Multi-Tenor Drums
Click on the image to enlarge…
…or click here to download in PDF format.

This exercise has gone through many tweaks and additions over the years.  In its current version, I think it’s a great tool in the arsenal of any percussionist.  When I first encountered this exercise, the first four sections were taught to me and the other students at Princeton High School (Princeton, Texas) by Rick Beckham.  This covered the accented 8th notes off the right hand and left hand, plus the accented 16th notes off the right hand and left hand.  He later added the next four sections (8th note flams leading with the right and left, plus the accented paradiddle patterns leading with the right and left).

The four main patterns—8th notes, 16th notes, flams, and paradiddles—are great for developing the control needed to distinguish accent and tap heights.  I have used this core exercise with several different drum lines, and it has been quite effective.

Over time, I decided to expand the exercise.  In personal practice, I used the basic accent structure on a number of different rudimental patterns.  When teaching it to a full drum line, I decided that I wanted to write a mallet part that went through the circle of fifths, covering all 12 major keys.*  I also wanted a bass drum part that worked split 16th note triplets and 32nd notes.  So I picked two of my favorite rudimental patterns that worked with that rhythmic structure to add sections 9-10 and 11-12.  In short, this exercise has something really useful for every section.

Since 12 sections are covered by going through the circle of fifths and the snare drum part is similar to the standard “Bucks” exercise, I decided to call the exercise “12 Bucks.”  Here is the breakdown of the skills required for snare drum and tenors:

  • Sections 1-2:  One-handed accented 8th notes.  Focus on maintaining a clear distinction between accents and taps.  Keep your taps low and controlled.  Make sure your accents are strong, not wimpy.  The tenor exercise is deliberately on one drum, so that the player can focus on the Y-axis motion and the fundamental accent/tap control.
  • Sections 3-4:  Alternating accented 16th notes.  This should follow the exact same technique as sections 1-2, except the opposite hand is now “filling in” the 16th notes.  All taps should be consistently at the same height and volume.  The tenors now move the accents to an adjacent drum.  Keep the accents strong and the taps consistently softer.
  • Sections 5-6:  Alternating 8th note flams.  These sections are excellent for focusing on the three heights of accents, taps, and grace notes.  The accents and taps should remain the same from the previous sections.  The additional grace notes should be softer and lower than the taps.  Once again, the tenors are deliberately on one drum in order to focus on the fundamentals of good flam technique.
  • Sections 7-8:  16th note paradiddles.  These patterns get a bit trickier.  Watch out for the sticking on measures 2 and 4!  The key to these section is that they should sound the same as the 16th notes in sections 3-4.  Do not let the “diddle” part of the paradiddles sound weaker or stronger than the singles you played in sections 3-4.
  • Sections 9-10:  Single stroke fours and single stroke sevens.  These rudimental patterns get your hands moving a bit quicker with the 16th note triplets.  They also require more precise timing focus.  Many drummers have a tendency to “cheat” the length of the initial 8th note by starting the triplet too soon.  Of course, you should practice the whole exercise with a metronome, but this section would especially benefit from doing so.
  • Sections 11-12:  “RLLL” quad groupings.  Once again, the 16th notes patterns should sound the same as sections 3-4 and 7-8.  Of course, these sections require more finger control in order to move each hand at the speed of 16th notes.
  • Tag ending:  A final syncopated measure to cap off everything!  Notice that the snare and tenor triplet rhythms are slightly different.  The tenors start on the downbeat, while the snares conclude on the upbeat.  Both parts should be played precisely in time in order to hear the tradeoff between sections.

Have fun learning these patterns.  Once you have them down, be adventurous and create your own variations!


*[Yes, I know there are technically 15 keys, but I’m not going to get into that debate right now.]

7 Reasons You Should Consider Entering a Solo Competition


Solo competitions can be an incredibly value experience for those who participate. Off the cuff, I decided to give a short talk about why I think everyone should consider competing in them.  Here are my seven reasons (plus two bonus thoughts!).  I think reason #7 is woefully neglected by performers and educators alike.

Here is a transcript of Read more “7 Reasons You Should Consider Entering a Solo Competition”

4-Mallet Keyboard Exercise: Double Lateral Chromatic Pattern

Click on the image to enlarge or click here to download in PDF format.

I live near the Dallas/Ft. Worth metroplex in Texas.  One of the most popular drum line contests in this area is the Plano Drum Line Competition, which is held every year in September.  In addition to offering the opportunity for dozens of drum lines to compete, Plano’s contest also features an individual & ensemble competition.  For each instrument, there is a “compulsory” that is to be performed before the contestant’s solo.  For snares and tenors, they must open and close a flam drag.  For timpani, they must perform “My Country, ‘Tis of Thee” on a maximum of three drums.  For four-mallet keyboard percussion, they are required to play the above double lateral exercise.

When I first saw this exercise, I really liked it.  I wondered how the contest hosts had decided to use it.  Well, this past year, I decided to start working through every exercise in Leigh Howard Stevens’ classic Method of Movement for Marimba.  (Of course, I had played from various sections before, but never in such a focused and goal-oriented way.  This time I was determined to play through the entire book.)  Lo and behold, this exercise is in the book’s section on double laterals.

I offer this bit of personal background info just to let you know why this exercise has stuck with me.  I’m glad it has.  It really is a great exercise for working double laterals across the keyboard.  I recommend starting it slowly until you feel confident in each position.  It is probably easiest to memorize the pattern.  Focus on striking the bars on the proper beating spots.  Also take care that each note resonates at an equal volume.  Don’t drop the second note of each lateral!

This exercise is obviously written for marimba, but it can also be played on xylophone and vibraphone.  For xylophone, simply play the exercise an octave higher.  For vibraphone, transpose the exercise up a minor seventh.  That is, take it up an octave, and then take it down a whole step, so that your first four notes are F, B-flat, B-flat, F.

Multi-Tenors Exercise: Paradiddle Pretzel

Click on the image to enlarge or click here to download in PDF format.

Here is a fun exercise that will put your arms in a pretzel.  I won’t claim that this exercise is the most essential (or even the most logical) exercise ever, but it covers a lot of paradiddle patterns around the tenors—and it’s just plain fun to play.  Some of the patterns are easier, and some of them are harder.  There is a continual contrast between standard patterns and not-so-standard patterns that makes the overall flow tricky to navigate.  Have fun with “Paradiddle Pretzel”!